30 June 2015

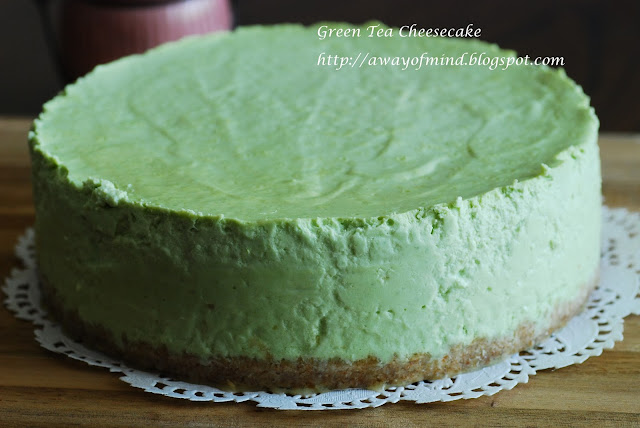
Green Tea Cheesecake with Milo Powder


I seldom bake cake as cake is not the food that I can put on my breakfast table. However, I bake this green tea cheesecake again because this heavy cream cheese cheesecake will be a good dessert for guests. I double the quantities to make a tall cheesecake, and I think I did a good job on mixing the green tea powder to the cream cheese mixture this round. The mild green on the cheesecake is very lovely! 

Now, why Milo powder and not cocoa powder? Just because I don't have sweetened cocoa powder and the combination of Milo and mild green tea taste great!  


Yield: 8 inch round baking pan, for 8 serving
Recipe adapted from 幸福甜点81道, 星期天的烘焙时光 with changes
15 pieces of biscuits
30g unsalted butter, melted

Green Tea filling:
600g cream cheese
100g sugar 
3 eggs
70g sour cream 
70g thickened cream
160g butter, soften
30g corn flour
12g green tea powder
10g gelatine powder, add to 1.5 tbsp of hot water, whisk well until dissolved

Method:

1. Place biscuit in a plastic bag and crash it into small crumbles, stir in the melted butter. (If you prefer the crumbles to be smoother, blend it in the blender)

2. Place the baking paper in the cake pan and add in the biscuit crumbles. Press down the biscuit to the cake pan. Bake the biscuit in oven at 150C for 10 mins. Set aside to cool.

3. Double boil the cream cheese and sugar in a big bowl, stir the sugar until dissolved and mix well with cream cheese. Take the bowl away from the heat, add the egg, one at a time. Mix well.

4. Use a portion of thickened cream  (30g) to mix with green tea powder. Mix well. Gradually add in the thickened cream, sour cream, butter and corn flour. Add in green tea mixture. Stir well. Add in gelatine mixture, mix well.

5. Sieve the batter and pour in the sieved batter to the cake pan. 
6. Prepare the water bath, place the cake pan in the water bath. Bake at 120C for 1 hour and 15 mins. Check if the cake is baked properly, the middle of the cake should be wobbly a bit but the surface should be dried to touch.
7. When the cake is done, take out from the oven and let it cool down and set before put in the fridge. Dislodge the cake only when the cake is harden.


29 June 2015

Red Bean Buns / Rolls 红豆沙面包


Dig out my homemade chunky red bean paste which I cooked sometimes ago using 800g of kidney red bean (I used kidney red bean in cans) to make this batch of bread, I just used about 400g of the red bean paste for this bread making. I didn't blend my red bean to smooth paste, it still contain bits of red bean chunk. The good thing about homemade red bean paste is you can control how sweet you want the paste to be. 

My son was "wow" by the twisted shape of this bread, however, the soft bread texture and the chunky red bean paste are the real winner. 


Recipe adapted from 65C 汤种面包 by 陈郁芬, 花生面包 with changes
Yield: 14
Ingredients:
Water Roux:
25g bread flour
125ml water

Bead Dough:
210g bread flour
56g cake flour
20g milk powder
42g sugar
1/2 tsp salt
6g dried instant yeast
1 egg
85g water
84g water roux
22g unsalted butter, chopped into small pieces

Filling:
800g kidney red bean in cans
400ml water
some sugar (depends on how sweet you want the bean to be)
3 tbsp cooking oil

Glazing:
1 egg, lightly beaten mixed with 1 tbsp golden syrup


Method:
1. Prepare water roux: Cook the bread flour with water in a pot until it thicken, cover, set aside to cool.

2. Prepare the filing: Cook the kidney red bean with water in a saucepan, add sugar. Mash the red bean into paste when it is very soft (Add more water if the red bean paste is still not up to your require softness) Add cooking oil and keep stir fry the red bean paste until the water dry out. When the paste is able to pull away from the bottom of the pan, it means it's ready. Set aside to cool. Take 400g of chunky red bean, divide the red bean into 14 portions, I roll them into small cylinder logs for easy wrap into bread dough. 

3. Prepare bread dough: Add all dry ingredients for bread dough in the KA, add water roux and let the KA mix with speed 1 for a min, gradually add water and change the KA speed to 2. When the rough dough is form, add in the butter. Change the KA speed to 4 and let it knead the dough until elastic window pane stage. 

4. Cover and let the dough proof until double its size. Punch out the air, and divide the dough into 14 dough balls, let it rest for 10 mins.

5. Flatten the dough into long shape, place a piece of red bean filling in the middle, wrap and seal the edges. Use the palm to flatten the dough a bit, then use the rolling pin to flatten the dough into 10 inch long. Flip the dough and flatten the dough so it will not stick on the worktop. 

6. Cut four lines in the middle of the dough, DON'T cut through both ends of the dough. Roll up the dough in one direction, make it into a rod shape, twist the dough to form flower. Tugging the end of the dough underneath to seal the twist. 

7. Let the bread dough proof until double its size. Egg wash, bake in the preheat oven at 180C for 6 mins, then bake at 150C for 9 mins. 


28 June 2015

Flower Hot Dog Buns 热狗花朵面包


This is another bread making using 65C water roux method. I made six hot dog buns in flower shape and 12 mini hot dog buns. Another popular soft bun love by my family.  


Recipe from 65C 汤种面包by 陈郁芬,pg66-67
Ingredients:
Water roux:
25g bread flour
125ml water

Bread dough:
195g bread flour (used 200g)
90g top flour (used cake flour)
6g dried instant yeast
1/4 tsp salt
30g fine sugar
12g milk powder
1 egg
65g water
75g water roux
45g unsalted butter, small pieces

Filling:
6 big sausages
6 big sausages cut into half > 12 small sausages 

Glazing:
some spring onion, chopped
1 egg, lightly beaten
1 tbsp salad oil or vegetable oil
1/4 tsp salt
1 tbsp golden syrup
some white sesame seeds 

Method:
1. Prepare water roux: Cook the bread flour with water until the liquid just thicken. Set aside to cool.
2. Prepare bread dough: In the KA mixing bowl, place all dry ingredients, add egg and water roux. With KA speed 1, mix for a min, then gradually add in water. Change the KA speed to 2. Let KA knead the dough until it form rough dough (you may dust some extra flour if it is too sticky). Add butter and change the KA speed to 4. Let it knead until the dough is able to pull away from the mixing bowl. Check if the dough has reach window pane stage. 

Cover the dough and proof until it double its size. Punch out the air and divide the bread dough into the desire portion. Let the bread dough rest for 10 mins. Flatten the dough ball into long and place a piece of sausage in the middle. Wrap it up and seal the edge. Use a scissor to cut 4 lines along the sausage dough, cut through the sausage but NOT the bottom of the dough. Twist the dough and arrange the sausage in round. Let the dough proof until it double its size again. 

3. Prepare the glazing: mix the salad oil with salt, golden syrup and egg together, mix well. 

 Use a brush to egg wash the bread dough, sprinkle with chopped spring onion and sesame seeds. 

4. Bake at preheat oven at 160C and bake for 15 mins. (The oven temperature may varies depends on the oven capacity).

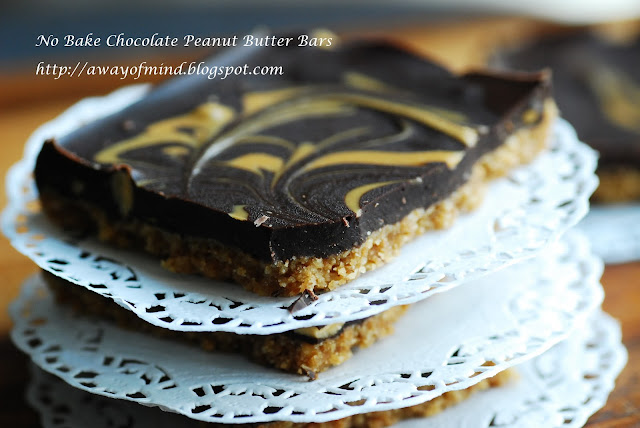
No Bake Chocolate Peanut Butter Bars


Bitter Sweet is what this chocolate peanut butter bars taste like. 

It's like our life we can't see our future but only trust on God leading the way. Every time when there is a need to embark on a new path we will resist as there is unknown, there is fear. However, when you trust on God and leap forward, you see light and future. When time to say goodbye, it always sad because is either friends leave you behind or you leave them on the same place. Bitter Sweet, when there is friendship, there is stories, when there is love, there is tears. 

When I saw the Tastemade's video on the No Bake Chocolate Peanut Butter Bars by Home Cooking Adventure I know is time to clear my bitter chocolate bar! I don't have enough creamy peanut butter, I add some chunk peanut butter in the chocolate layer as well. This bake is a surprise to me as it is not very sweet. This is such an easy and beautiful bake!  


Yield: 16 serving

Ingredients:
Base:
200g digestive biscuits 
70g unsalted butter, melted
120g crunchy or creamy peanut butter

Chocolate layer:
200g bittersweet chocolate 
60g creamy peanut butter, divided into half (30g each)


Method:
1. Place digestive biscuits into the bowl of food processor, blend until it is crumbs form. Add melted butter and peanut butter, process until it is combined.
2. Line the square baking pan with parchment paper, two edges are lined longer so it will be easy to lift up when the chocolate bar is set.
3. Spread the peanut butter mixture into the prepared baking pan and compact it to create a smooth surface. 
4. Melt chocolate and 30g of creamy peanut butter over a double boiler. Stir until smooth. Pour the chocolate mixture over the peanut butter layer in the baking pan. 
5. In another bowl, melt the remaining 30g peanut butter over low heat, with a teaspoon, add the melted peanut butter on top of the chocolate layer, with a chopstick create swirls on the surface.
6. Refrigerate for at least 2 hours or until it is set. Let it sit 10 mins at room temperature before cutting. 


26 June 2015

Vegetable Spring Rolls 春卷


I have been making this type of crispy spring rolls since I learnt it from my friend who used to make spring rolls in bulk for school event. I'm thankful that she shared the tips on how to fry the spring rolls filling and wrap it well so it will not open up when deep fry. So, no more soggy oily spring rolls from me. 

This time I managed to take some photos on the spring rolls before my family finished it in second. The spring roll pastry will remain crispy for a while and I love the crunchy vegetable with glass noodles in the filling, able to munch on the different layers of texture in the spring rolls, is so good!  


Yield: 32 pieces big spring rolls
Ingredient:
1 big radish, shredded (~1kg)
3 carrots,  shredded (~600g)
1 small cabbage, shredded (~500g)

100g glass noodles, blanched to soft
3 tbsp minced garlic
1 tsp minced ginger

a handful of dried mushrooms, wash, soak and sliced into thin (~15 small size mushrooms)
3 tbsp of oyster sauce (to taste)

3 tbsp fish sauce (to taste)
2 tbsp sugar (to taste)
some fried shallot 
32 pieces spring roll pastry sheets, thawed
3 tbsp cooking oil
deep frying oil


1 egg white (for sealing of pastry)

Method:

1. Heat up wok and add cooking oil. Stir fry the minced ginger then add minced garlic. Stir fry until fragrant.
2. Add shredded radish, carrot, cabbage and mushroom, stir fry for 5 mins, then add oyster sauce, fish sauce and sugar. Stir fry the vegetable for another 5 mins then dish out and spread it on a baking tray to cool (The filling should not contain any gravy). Mix with the blanched glass noodles, mix well. 
3. Assemble: Thaw the spring roll pastry sheet, take one pastry sheet and place 2 spoonful of vegetable filling on it, sprinkle with some fried shallot and fold the pastry up half way, then fold in the sides and roll up the pastry, seal the end of the pastry with egg white. 
4. Heat up oil in a small deep saucepan, lower a few pieces of spring roll, deep fry until the pastry is light golden brown. Drain the oil with kitchen paper before place on serving plate. Prefer to serve hot.

25 June 2015

Putu Mayam (aka Idiyappam)


Putu Mayam (Idiyappam) is rice flour noodles goes together with shredded coconut and palm sugar or dark brown sugar. It is an Indian snack, the ingredients used is about the same as Kueh Tutu/ Putu Piring, however, if compare the taste of Putu Mayam with Kueh Tutu, I would say that, they are totally from different dimension, yes both are using rice flour but as Putu Mayam comes in the form of noodles and there is oil in the rice flour dough the taste is more refine. 

For this Idiyappam making, I'm using the Thai brand rice flour. Add water until the wet rice flour dough is able to hold together, it will not stick too much to hands. Turning the Putu Mayam press mold was such an enjoyable experience, in fact it is easy to use. My last Putu Mayam was in Penang, that time my late grandfather still there, he loves Putu Mayam, this is my first Putu Mayam after so many years!

This morning while making Putu Mayam, I was baking another batch of Cranberry Cream Cheese bread too! ^^ 


24 June 2015

Kueh Tutu / Putu Piring 嘟嘟糕


Kueh Tutu or Putu Piring or Kue Putu Ayu is a round shaped steamed rice flour cake with shredded coconut and palm sugar/ gula melaka as its filling, but nowadays it has peanuts or even red beans filling too. I have not taste it since young, recently a friend of mine told me it tastes really good, she gamely challenge me to bake-along with her. As I don't have the special Kueh Tutu mold, I used tart mold it seems a great choice to do this work  too! 

Thanks to my friend, this lovely, a bit soft chewy texture of steamed rice flour cake is here. This is my second attempt, the first one came out too dry as I steamed the Kueh Tutu together with the tart mold on. By the way, the rice flour I used is the local brand rice flour.  

Notes:
1. The rice flour mixture has to be wet enough to hold into a rough dough yet able to break into fine crumble. When the flour is put through a sieve, it will turn into very fine powder like in my photo.
2. Transfer of rice flour cake dough from mold to the steamer has to be very careful as I am not using the individual muslin cloth. Some loose rice flour crumble may break off but as long as it still in one piece during steaming, it will come out one piece and not break into crumble in your hands. 
3. If you do it right, the kueh tutu will stay soft and will not turn hard. (I checked my last piece of Kueh Tutu after 4 hours, it stays soft and fluffy)


Recipe adapted from Back To My Kitchen, I made half of the ingredients
Yield: 8 pieces

1 cup of rice flour
80~90ml of water (add gradually)
2~3 pandan leaves, cut into short length
1/2 tsp salt

Filling:
75g dark brown sugar (Cane Sugar)/ gula melaka/ palm sugar
some shredded coconut +1/4 teaspoon salt, steamed

For Serving:
Banana leaves
some shredded coconut + dark brown sugar/ gula melaka/ palm sugar 


Method:
1. Pan fry the rice flour together with pandan leaves without oil for 5 mins. Set aside for cool. Discard the Pandan leaves.
2. Add the salt to rice flour, gradually stir in water, use the finger tips to rub the flour together, it should be able to hold it into rough dough yet able to break it into fine crumble. Add a bit more water if the dough is not able to hold into rough dough. 
3. Sieve the flour, it will turn into fine rice flour powder. 
4. Heat up the steamer, wet a piece of muslin cloth and place it in the steamer
5. Scoop some flour into the Kueh Tutu mold, fill up 1/3 of it. Place a teaspoon of filling over the rice flour then cover it will more rice flour. Level the rice flour in the mold.
6. Gently transfer the Kueh Tutu mold with open side downward to the steamer. Dislodge the mold, leave the Kueh Tutu in the steamer, cover it with wet muslin cloth and steam for 5~6 mins.
7. When it is done, take the Kueh Tutu out from steamer and serve it on banana leave with shredded coconut and sugar. 


20 June 2015

Dongpo Pork (Dong Po Rou 东坡肉)


今天上的菜肴是我家大王一个人可以吃完半公斤的东坡肉!!那嫩滑的肥油一入口就融化,减肥这回事你将把它变成明天又明天的事。。。嘴馋真可怕!!我因腰部向衡发展的趋势太快了只敢吃一口!!

Dongpo Pork (or Dong Po Rou) is one of the Chinese exquisite braised pork belly, after cook it in wok for 30 mins then transfer the pork belly to slow cooker for another 3 hours of slow cooking will result a delicacy that is rich in flavour and non greasy melt-in your mouth texture! 

My hubby loves this dish so much, he alone can finish 500g of pork belly in one meal! The tantalizing aroma is hard to resist! As for me, I only dare to eat one mouthful of the Dongpo pork looking at the speed of my increasing waistline and the number on the weighting machine is always going up!!! ok... just licking on the gravy!!    


Recipe adapted from Rasa Malaysia with changes 
Ingredients:
1 kg of pork belly
4 scallions, cut into one inch length
some straw strings or kitchen twine to tie the pork belly cubes, soak in water until soften
2 tbsps cooking oil
4 cups water
an inch length ginger, sliced
2 star anises
2 cinnamon sticks
2 tbsps sugar (to taste)
5 tbsps light soy sauce (to taste)
5 tbsps dark soy sauce 
8 tbsps red rice wine (hua diao wine, etc.)
1 tbsp corn flour + 1 tbsp water, mix well

Method:
1. Rinse and cut the pork belly in big block (~4cm square). Tie pork belly cubes with straw strings and scald in boiling water for 2 mins.
2. In a wok, heat oil and fry the sugar until it turns golden brown, add water and bring to a boil. Add spring onions, ginger, star anises, cinnamon sticks, light soy sauce, dark soy sauce and 4 tbsps of red rice wine. Bring to a boil again, add pork belly cubes, skin side down on the wok. The water level should be able to cover the pork belly. Cook for 30 mins. Taste the gravy, add sugar or light soy sauce if needed.
3. Transfer the pork belly cubes to a slow cooker, cook on high heat, with skin side of the pork belly facing upward. Pour all the gravy into the slow cooker, add the remaining 4 tbsps red rice wine. Cook for at least 3 hours or until the meat is tender. 
4. Gently skim away the fats/oil on top of the gravy. Take out the Dongpo Pork and place it on serving plate. If you prefer the gravy to be a bit thicken, transfer the gravy to a saucepan and on medium heat, add the corn flour mixture (add sugar to taste if you prefer the gravy to be sweeter) and stir until the gravy thicken. Pour the gravy on the Dongpo Pork. Serve hot.


Milk Crisp Buns 奶酥面包


Milk Crisp Bun is a bun filled with milk powder-butter filling and topped with fine coconut flakes. The fragrance of the coconut topping from this bun is amazing! It is one of my son favourites bun! 

The bread dough was very sticky to handle and extra flour for dusting is required. I made 15 small buns out of the 210g bread flour. 


Recipe adapted from 65C 汤种面包 by 陈郁芬, pg 40-41

Yield: 15 pieces
Ingredients: 
water roux (Tangzhong):
25g bread flour
125ml water

Filling:
40g unsalted butter
30g vegetable shortening 
30g icing sugar
1/8 tsp salt
30g egg
1 tbsp corn flour
80g milk powder

Bread dough:
210g bread flour
56g cake flour / top flour
20g milk powder
42g sugar
1/2 tsp salt
6g dried instant yeast
30g egg
85g water
84g water roux (Tangzhong)
22g unsalted butter
extra flour for dusting of dough and hands

Glazing:
1 egg + 1 tsp golden syrup, mix well
some fine coconut flakes

Method:
1. Prepare water roux: Cook the bread flour in water until is just thicken. Cover and set aside for later use.

2. Prepare filling: In a bowl, whisk the butter and vegetable shortening together. Add the icing sugar and salt, whisk until the mixture turn light and fluffy. Add the egg mixture in batched, mix well before each addition. Then fold in the flour mixture (corn flour and milk powder), mix well. Divide the filling to desire portions and keep it in the freezer, take out from freezer 5 mins before use. 

3. Prepare bread dough: In the KitchenAid mixing bowl, add the bread flour, cake flour, milk powder, sugar, salt, dried instant yeast, egg and water roux. Stir on speed 1 for a min, before gradually add the water. Continue with speed 2, mix until the bread dough come together then add the butter. Change to speed 4 and let the KA knead the dough until window pane stage. Dust the bread dough with extra bread flour if it is too wet to form rough dough. 

Place the bread dough in a briefly greased bowl, cover and let it proof until double its size. Punch down the air, divide the dough into 15 portions. Let it rest for 10 mins. Flatten the dough and wrap in the filling, seal up the edges. Seam side down on the baking tray. 

Let he bread dough balls proof until it double its size again, egg wash and dip individual bread dough ball into the fine coconut flakes, place the bread dough seam side down on baking tray again. Bake at 160C for 15 mins or until the top of the bread is lightly brown. 


19 June 2015

Vietnamese Salad Rolls (Goi Guon) 越式沙拉卷


Is another super hot day, let's make some simple cooling salad rolls for this summer! If you like herbs, this Vietnamese Salad Rolls (Goi Guon) will be perfect for you. Is easy to make and it doesn't has a fixed recipe for the filling, you can add whatever you like but basically the main ingredients for this salad are dried rice paper wrappers, coriander leaves, lettuce (or butter lettuce), bean vermicelli (or rice vermicelli also can), carrot, and seafood.

I have blanched the bean vermicelli until soft, rinsed it with cold water; add some oil, a teaspoon of light soy sauce, fish sauce and a tablespoon of lemon juice, then toast the mixture together before used. The Vietnamese Salad Rolls itself is flavourful even without dipping sauce. Yes, I soaked the prawn with a teaspoon of sugar cold water before used too.

Ten salad rolls is not enough for my family! The herbs and refreshing taste of the salad rolls will make you wanting to munch more of it!

Note: 
To prevent tearing of rice paper wrapper, just briefly dip the rice paper wrapper in a plate of water. Take the rice paper wrapper out from water even it's still hard. Place the pattern checker side downward on a flat surface, the rice paper wrapper will soon turn soft.  

This salad rolls has to eat on the same day, keeping the salad rolls in fridge without cover will turn the rice paper wrapper hard. 


Recipe refer to Homestyle Vietnamese Cooking by Nongkran Daks and Alexandra Greeley with changes

Yield: 10 salad rolls
Ingredients:
20 medium size prawns, cook the prawns in boiling water until it just turn pink, remove and soak with cold water until it is cool. Peel and devein, soak the prawn in a teaspoon of sugar with cold water for 15 mins.

100g dried bean vermicelli, blanched for 2 mins in boiling water until soft, rinsed with cold water and drained (add 1 tablespoon of cooking oil, a teaspoon of light soy sauce, a teaspoon of fish sauce and a tablespoon of lemon juice, toast well) 

10 dried rice paper wrappers, each 20cm in diameter
a bunch of coriander leaves, cut into an inch length
2 inch of cucumber, cut into an inch length, thinly sliced
2 inch carrot, cut into an inch length, thinly sliced
some lettuce, washed and separated
one red onion, chopped into small
3 crab meat sticks, cut into small 

Method:
1. Place some water in a plate the same size or larger a bit than the rice paper wrapper. Briefly dip a piece of rice paper wrapper in the water, take the rice paper wrapper out even it is still hard in your hand. (Provided all edge is wet) 
2. Place the rice paper wrapper on a dry surface, place a piece of lettuce on one edge of the wrapper, top with some carrot, cucumber, crab meat, bean vermicelli, coriander leaves, and chopped onion.  
3. Fold the closest edge of the wrapper over the filling, then fold in the sides and roll up the wrapper halfway. Place two pieces of prawn along the roll and top with some coriander leaves, then roll up tightly the wrapper to complete the folding. Repeat until all the ingredients are used.