26 September 2018

Teochew Spiral Mooncakes 2018 芋头酥


This year homemade two batches of Teochew Spiral Mooncakes, total 24 pieces. The filling is homemade purple yam paste. I love the end result, the flaky pastry with very pretty natural colour of violet for the filling. 

Most of the spiral mooncakes was served to my Life Group members, some were as a gift to church friends. We had an awesome time celebrate the Mid-Autumn Festival while kids get to play traditional paper lanterns with candle. Hope they enjoyed this homemade not so sweet goodies for the Mid-Autumn Festival. A piece of taste from home. 


for 24 pieces has to double the below recipe:
Ingredients:
water dough:
200g plain flour
15g sugar
70g vegetable shortening
105ml cold water

oil dough:
160g pastry flour
80g vegetable shortening
a few drops yam paste
a few drops food colouring (paste)

Filling:
500g purple yam 
80g fine sugar
30g butter
20g full cream milk powder


Method:
1. Prepare the filling: Peel off the skin of yam, cut the yam into small cubes. Steam the yam in steamer for 20 mins. When it is done, mash the yam with a fork. Add the sugar, butter and milk powder, mixed well. Set a side to cool. 

Divide the yam paste into 12 portions. Roll it into balls. (If you place it into fridge overnight, make sure to bring back to room temperature before use)

2. Prepare the water dough: Add all ingredients for water dough together, knead for a while (~5 mins) to form soft and pliable dough. Cover with plastic cling and let it rest in the fridge for ~30 mins. 

3. Prepare the oil dough: Add all ingredients for oil dough together, use the hand to form a rough dough. (Do not over knead the dough). Cover with plastic cling and let it rest in the fridge.

4. Assemble: Divide the water dough and oil dough into six portions respectively. Roll them into round balls. Take a water dough ball, flatten and wrap in oil dough. Flatten the dough ball with your palm and use the rolling pin to flatten the dough into long shape, roll up Swiss roll style. Let the dough rest for 10 mins. 

Flatten the rested dough into long shape again, roll up Swiss roll style. Let the dough rest for ~20 mins. Cut the dough into half. The cut side face upward and flatten the dough with palm. Flip the cut side downward and wrap in the yam paste filling. Bring the edge together and seal. Repeat for the remaining dough. 

5. Place the Mooncakes dough on lined baking tray and bake at 170C for 25~35 mins. or until the flaky swirl appears. 

Chinese Steamed Pumpkin Cake 蒸金瓜糕


This Chinese Steamed Pumpkin Cake or Steamed Savoury Pumpkin Cake was done more than two months ago. A dish which I ate a lot when I was young, my mum loves to cook this Chinese Steamed Pumpkin Cake, the saltiness of dried shrimps, minced pork and dried mushroom in this dish blended in so well with the sweet smooth pumpkin paste. It is a dish I wish I can cook more often!

I was updating a setting in my blog, a chance for me to read what I had written many years ago. I love reading my own posts where I could find traces of my memories, I wish I'm still able to carry on writing my baking journey as much as I can in the way I love. 

Making a 26 cm round tray and a 15 cm round tray.


05 September 2018

Mooncake Order 2018


This year is the first year I'm selling the mooncakes. Baked about 70 pieces of Traditional Baked Mooncakes and made 100 pieces of Lychee Liqueur snowskin mooncakes. I learnt a lot from this "test run" provided by my church ladies, the management of timing, the ordering of boxes, the storage and delivery issues. I'm grateful of the confidence they have on my baked goods. 

A note for myself on traditional baked mooncake, the CSR Golden syrup is a better brand than Lyles for me as it is more cost effective, the ratio of the golden syrup and peanut oil are crucial to get the pretty imprint on the mooncakes. 

For the snowskin mooncakes, the liquid contains will has an effect on the snowskin texture, add more liquid if possible, the kneading and resting of dough are important. 


04 August 2018

Loh Bak (Five-Spice Pork Roll) 五香肉卷


Penang Loh Bak  (Five-Spice Pork Roll) 五香肉卷 is always mixed up with the Ngoh Hiang which is a very popular dish in Singapore because they have so much similarity in the ingredients as well as the way how the dish is being prepared. However, a true Penangite will know the different between Loh Bak and Ngoh Hiang. 

Loh Bak is always prepare using the pork strips with main ingredient such as yam (some, like my late-grandma and my mum prefer wrap the pork roll without yam), no steaming of the pork roll before deep frying it into golden brown meat roll. As for the Ngoh Hiang, it is prepare using the minced pork with ingredients such as fish or prawn paste in it, steaming of the pork roll before deep frying is require. 

I love both Loh Bak and Ngoh Hiang, but my siblings love only Loh Bak because that's how my late grandma and my mum prepare the festive dish, this aromatic five-spice pork roll is filled with pork strips with crispy crunchy exterior bean curd skin and flavourful filling. The fragrant of five-spice lingered in the kitchen after I deep fried the Loh Bak, this made me missed my hometown... a lot. 

yield 15 pork rolls 


Ingredients:
a few sheets of dried bean curd skin, cut into smaller piece if require. 

Filling:
800g pork belly fillet, sliced into thin strips with thickness of estimate 1 cm
500g yam, peeled, cubed and steamed until soft
some spring onions, cut into small rings
2 big onions, peeled and chopped into small
5 tbsp Chinese five-spice powder, add more if you love the taste
2 tbsp oyster sauce
2 tbsp tapioca flour
1 tbsp sesame oil
2 tbsp sugar
1/2 tsp pepper
1/2 tsp salt

Dipping Sauce:
Thai sweet chilli
1 lime juice

Method: 
1. Combine all the ingredients for the filling in a  big bowl, mix with a pair of chopstick. Keep in fridge for 30 mins.

2. Place the dried bean curd skin on a flat worktop, clean it with a piece of clean wet kitchen towel, to remove the salt on the bean curd sheet. Spoon 2-3 tbsp filling on the bean curd sheet, fold the edge over the filling, fold in the left and right sides and roll up to form a log. Remember to roll up tightly. 
3. Prepare the wok for deep-fry the pork rolls. Turn the heat down to medium when the oil is hot, lower the pork roll into the hot oil, one or two at a time. Deep fry for 5-10 mins or until the bean curd skin is light brown and the filling is cooked. Drain the Lor Bak on a kitchen paper.
4. Serve it hot with the whole pork roll or cut into smaller pieces and serve with Thai sweet chilli-lime sauce. 

03 August 2018

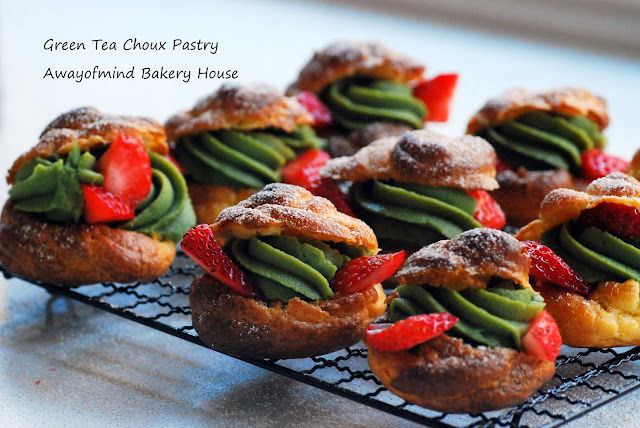
Green Tea Choux Pastry 抹茶泡芙


These two weeks I have been baking a few batches of choux pastry, the result is satisfying.  It has been a while I didn't make any dessert and trying new recipe, but I realise that returning to bake and do what I always passion about and love make me happy, hiding my own passion doesn't work well for me. I can't forget how the ladies I met in Qatar always inspire each other to bake and cook lovely food. I love the time we experimented food in our own kitchen then shared the result to each other to discuss how we could do better next round. I also remember P was the one brought all of us together to bake or prepare food for the school charity events. The happy friendship there is always in my heart. A true baker will appreciate another baker, I remembered when I found other bakers how happy I was. Sadly I yet to find a company over here to do the same.

Last weekend, a batch of 10 pieces of choux pastry was served to my guests, I love how the pastry cream and the choux pastry turned out. The choux pastry rises up to it maximum height, with a lovely crispy crust and hollow centre in the puffs. The pastry cream is just the right consistency, not runny and able to hold in the shape.

Then I baked another two more batches, again, this batch of mini matcha choux pastry which truly loved by my family, my hubby was able to enjoy this dessert... a less sweet version of choux pastry. I made about 27 mini choux pastry and it was all gone in a day time. I think this will be a great dessert for an event or party, do let me know if you would like me to bake for you. 

yield 27 mini pastry


Ingredients:
100g unsalted butter, soft
180ml water
125ml milk
125g pastry flour
5g caster sugar
3g table salt
5 1/2 eggs, lightly beaten (it depends on the absorption of the flour you use and also the size of your egg)


pastry cream:
200g whole milk
1/2 tsp vanilla powder
3 egg yolks
50g sugar
20g pastry flour, sifted
10g green tea powder

Method:
1. Preheat oven to 200C. Line baking tray with parchment paper.
2. In a small saucepan, combine water, milk, butter, sugar and salt. Bring to a boil over medium heat, then remove from heat.
3. Using a wooden spatula, quickly stir in the flour until combined, and mixture forms a ball. Return to heat and keep stirring until the mixture leaves the sides of the saucepan and a film forms on the bottom of the pan. Remove from heat.
4. Add in the egg one at a time, make sure each egg is fully incorporated before adding the next one.
5. Test the batter by taking a scoop of it using a wooden spoon. When you coat the batter and hang it down, the batter should form a smooth triangular shape.
6. Pour the dough into the piping bag fitted with plain piping tip. Pipe out 5cm circles onto a lined baking tray and gently smoothing out the pointed peaks with a moistened finger.
7. Bake the choux puffs for about 25 mins at 200C, you will see the choux pastry puffing up then reduce oven temperature to 180C and continue baking for another 20 mins. (It may varies as it depends on your oven capacity)
8. Prepare pastry cream: 
Add milk, vanilla powder to a saucepan and bring to a boil. 
In a clean bowl, beat egg yolks with sugar until the mixture is pale and fluffy. Add flour and green tea powder, mix well.
Add hot milk to the egg mixture and fold well. Return the egg and milk mixture to the saucepan and bring to boil over high heat, stir constantly. Continue to mix until the mixture is smooth and glossy, remove the saucepan from heat.
Transfer pastry cream to a pipping bag, after cool down, keep in fridge. Take out from fridge 30 mins before use. 
9. Assemble: Slice off a part of the top of choux puffs, pipe in the green tea pastry cream. Decorate as desire. 


19 July 2018

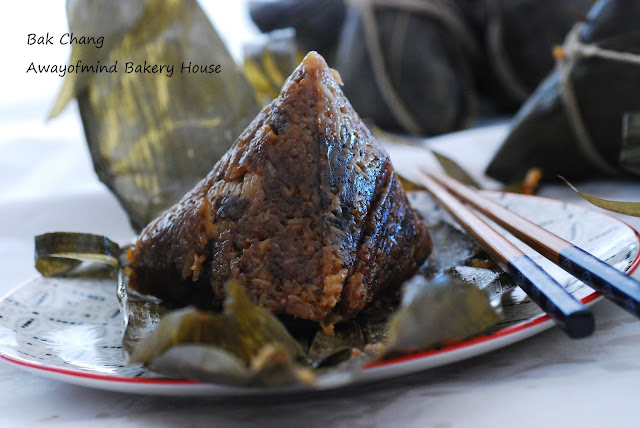
Hokkien Bak Chang 2018 / Zongzi (Glutinous Rice Dumpling)


A few more days, winter school holidays is going to finish. Today I have arranged a play-date for my son, while the boys playing football game on Xbox and I'm at the relaxing mood to allow myself coming back to this blog space to update my backlog posts, it's lots of them I don't think I can do it all at one go. ^^ 

The Dragon Boat Festival was long over. I have been keeping the traditional of making this Chinese dish for the past few years. My family especially my son loves all traditional dishes I made even though his growing up years was not in South East Asia. This year I had the chance to bless some of the families with my homemade Hokkien Bak Chang which they can't buy it in Sydney. The one selling in Sydney usually is made by mainland China sellers, the ingredients used and the taste might not be the same as what we get in Malaysia or Singapore. 

A simple glutinous rice stuffed with different fillings and wrapped in bamboo leaves can have so much nostalgia. For me it is thinking of home and always my late grandma. This year I have added a special ingredient in my Hokkien Bak Chang, Lee Kum Kee Chinese Braising Sauce 李锦记秘制红烧汁 enhanced the Bak Chang a lot.

This year I only wrapped 40 pieces, for the remaining ingredients I placed them in a steaming plate and served. 


Ingredients:
(wrapped 40 pieces, the ingredients is able to yield 55 pieces)
2 kg pork belly, cut into small length bite size of about 1.5 cm strips)

100 pieces dried chestnuts (size uneven, soak and boil for 15 mins, remove membrane bits in slits)
20 pieces salted duck egg yolks (I cut one into half)
300g dried shitake mushrooms (soak in water to soften and trim the stem, sliced into thin slices)
3 bulbs of garlic (finely chopped)
300g dried shrimp (soak in water for 10 mins, roughly chopped)
2.5 kg glutinous rice (soak in water overnight, drain rice)
300ml cooking oil (for rice)

5-6 tbsp light soy sauce (for rice)
5-6 tbsp dark soy sauce (for rice)
200 ml Lee Kum Kee Chinese Braising Sauce 李锦记秘制红烧汁 (for rice)
Marinated pork belly and sliced mushrooms:

3 tbsp sugar (to taste)
5 tbsp dark soy sauce
5 tbsp light soy sauce
5 tbsp five spice powder (can add another tbsp if you want it to taste stronger)
a few dashes of black pepper (to taste)
1 tsp salt (to taste)

250ml water
3 tbsp cooking oil


1. Marinated pork belly and sliced mushrooms: Add sugar, dark soy sauce, light soy sauce, five spice powder, a few dashes of black pepper and salt. Mix well and marinate overnight in fridge.


Step:
1. To prepare filling: heat 3 tbsp oil in wok, stir fry marinated pork and mushrooms for 5 mins,  and add dried chestnuts. Add 250ml water and let it simmer for another 15 mins. or until the pork is cooked. Add salt and sugar if requires (the taste has to be strong in flavour as the taste will be diluted when boiling in water), Set aside.

2. To prepare glutinous rice: add 300ml oil into the wok used in (1). Add garlic and dried shrimp, stir-fry until fragrant. Add glutinous rice, mix well. Sufficient oil added will ensure the rice wouldn't stick on the bamboo leave later. Add Lee Kum Kee Chinese Braising Sauce, add 5-6 tbsp light soy sauce and 5-6 tbsp dark soy sauce. (Depends on how dark and salty you want the glutinous rice dumplings to be), stir fried for 5 mins, Set aside.


3. To assemble: Overlap two pieces of bamboo leaves, make a cone shape and press in a spoonful of rice, top with filling and cover with rice again, spoon some gravy from the filling onto the rice, wrap up the rice dumplings and tie with kitchen twine.


4. To Boil: Prepare a big pot of water, mine is around 15 litre soup pot, add 1 tbsp of salt, when water boiled, lower down the glutinous rice dumplings (20 pieces each time for my pot), boil for at least 1 hour. The water level has to be always above the rice dumplings. Take out the glutinous rice dumplings while it is done, dip dry the rice dumplings by hanging. When serving time, steam the glutinous rice dumplings for 10 mins will allow you to serve the rice dumpling warm, go with sweet chilli. You can keep the extra rice dumplings in freezer, re-steam the rice dumpling before serving. 

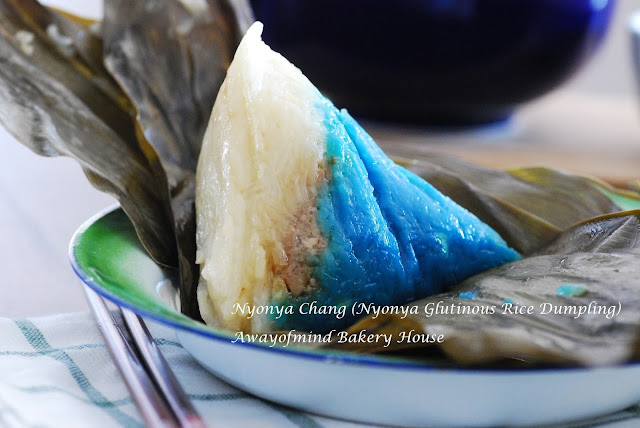
Nyonya Chang 娘惹粽子 (Nyonya Glutinous Rice Dumpling)


This Nyonya Chang was wrapped in 2017. Time flies and I didn't post it for more than a year, uploading the photos just to record on my cooking. This is a different version of chang, besides the minced pork belly and mushroom and other ingredients, the Nyonya Chang is with winter melon sugar which make the taste distinctive with its sweetness. I'll come back to write the recipe if I have time. 


04 May 2018

Egg Tarts 蛋挞


It has been some times ago since my last update. Lot of backlog posts too. My passion on baking still there, just no time to bake a lot like in the good old days, I miss the good time. Hope able to squeeze more time to do baking :) Baking is still my love. 

Using my previous recipe at here.


25 February 2018

Bak Kwa 猪肉干 (Pork Jerky)


Bak Kwa is the Hokkian word means grilled minced pork. A kind of Chinese style moist and grilled pork jerky. This was my third time making Bak Kwa and it is the first time having a satisfying end product. The meat is moist and tender, not over dehydrated and hard. Though it was hard work squatting in front of the oven relentless flipping the meat sheets. Homemade Bak Kwa without any colouring and preservatives is the best. ^^ 

I did some online research about the way others making Bak Kwa and the temperature used.  I'm referring to a YouTube by Lauren's Kitchen on how he made the Chicken Bak Kwa, combined with my own previous two experiments in the kitchen and conclude with the below recipe. Yes, the Bak Kwa needs to have certain thickness to taste better, don't roll it too thin. 

I love to eat my Bak Kwa sandwich between soft white bread! :p


Recipe: (Baking tray: 46 cm x 33 cm)
Ingredients:
(1.5Kg Minced pork with fatty, yield around 0.9 kg Bak Kwa)
1.5 kg minced pork with fatty
200 g sugar
3 tbsp light soy sauce
1.5  tbsp fish sauce
3 to 4 tbsp oyster sauce
1 tbsp five spice powder
2 tbsp cooking oil
2 tbsp Chinese rice wine
3 heap spoons honey
1 tsp white peppers
2 tsp salts 

Glazing:
4 tbsp honey + 1 tbsp warm water, mix well

Method:
1. In a mixing bowl, place all ingredients, mix well with a pair of chopstick until the meat turn gooey. Pack into plastic zipper lock, press out thinly but leave a thickness of 5mm. I packed the minced pork into 5 plastic zipper lock. Keep it in the freezer overnight. 

2. Thaw the minced pork from freezer 30 mins before you need to use the meat. Cut the side of zipper lock to take out the meat sheet. (Mine didn't have any meat liquid, so I don't need to drain them) Transfer the meat to a lined baking tray. I used two meat sheets just right for one baking tray. Cover the meat with the plastic, gentle use a rolling pin to spread the meat to the side or cover the tray fully. Remember do not over pressing the meat! 

3. Bake in a preheat oven at 140C for 10 mins, flip the meat and bake for another 10 mins.

4. Leave the meat to cool down a bit, cut the meat into 6 square pieces or your desire portions. 

5. Turn the oven to grill function, apply a layer of glaze to both side of the meat sheet, grill the meat at between 160C to 170C on the wire rack, use the long food tong keep flipping the meat. Apply glazing again if necessary. Adjust the oven temperature if the grill char the meat too fast. Grill until the meat reach your desire red and cooked colour. Keep the extra Bak Kwa in the fridge, when need, take out and heat up in the microwave for 15 seconds, serve warm.


22 February 2018

Yu Sheng (Lo Hei) 鱼生


Yu Sheng, Yee Sang or Lo Hei, is a very popular dish during Chinese New Year among Malaysian and Singaporean as it is a symbol of abundance and prosperity. I love this dish not only because of its vibrant colour but the pleasure and ecstatic energy that bring people together when we do the prosperity toss.  

Yu Sheng usually consists of raw fish (or sometimes we used smoked salmon) mixed with shredded vegetables such as carrots, radish and cucumber; and a variety of sauces and condiments. Nowadays, many people have developed this Yu Sheng to suit their family taste buds. 

I love my Yu Sheng to have thin and long shredded vegetables. So this dish must use hand shredded tool to produce the beautiful long shredded vegetables. The plate on the photo is a 24 inches round diameter metal plate. The shredded vegetables pile up to about 12 inches high. It is ready to feed around 20 adults. :) I have made this dish many times, this year posted this dish to make my own note.

初七人日快乐!^^


Recipe:
10 carrots, shredded
3 big radish, shredded
2 big cucumber, shredded
400g smoked salmon, cut into 2 inches slices
1 pomegranate,
1 pomelo, tear into small pieces  
1 orange, cut into small slices
300g ground peanuts with white sesame seeds
1 Yu Sheng's kit with the colour gingers and other condiments.

Sauce:
In a medium glass bottle, add 400 ml plum sauce, add 50 ml abalone sauce and squeeze in one small lime juice. cover the glass bottle with lid, shake well. set aside.

Oil:
200 ml olive oil 

Assemble: 
Place the shredded vegetables, smoked salmon, pomelo and orange in the middle or whatever way you like. Arrange the Yu Sheng's kit colours gingers and other condiments around the shredded vegetables. When is time to toss the shredded vegetables, pour the ground peanuts, white sesame seeds, plum sauce mixture and oil on top of the shredded vegetables. Toss the vegetables as high as you can and hopefully you can fish out the salmon! ^^ 


21 February 2018

Tang Yuan with Peanut Butter Filling 花生汤圆 (Glutinous Rice Balls with Peanut Butter Filling)


Tang Yuan, a Chinese dessert made from glutinous rice flour and usually served in sweet syrup. It is usually served on Winter Solstice Festival 冬至 and also a popular dessert for Spring Lantern Festival 元宵节 which is celebrated on the fifteen day of the first month in the Chinese calendar. It marks the final day of the traditional Chinese New Year celebrations.

This year I made the triple colours Glutinous rice balls with peanut butter filling in ginger syrup. A bit different from my previous making of Tang Yuan with black sesame filling in sweet osmanthus syrup or the normal Tang Yuan without filling.


Recipe:
yield: 47 pieces
Ingredients:
Peanut Butter Filling:
250g ground peanuts
4 tbsp fine sugar
4 tbsp peanut butter

Glutinous Rice Balls:

500g glutinous rice flour
2 tbsp sugar
~420ml water (200ml hot water, 220ml room temperature water gradually add) 
a drop of red food colouring
a drop of pandan paste

Soup:

a few slices of old ginger (peeled the skin, then lightly pounded on the flat sides) 
150 g brown sugar
1 litre of water
2 screw-pine leaves/pandan leaves (tie them into a knot)

Method:

1. Prepare the filling: Mix the filling ingredients together, mixed well. Divide into the portion you desire and chill in the fridge before use.

2. Prepare the tang yuan: in a mixing bowl, add half of the glutinous rice flour (250g) and sugar. Add in 200ml of hot water, use a chopstick to stir it together, then use the hands to knead the dough until it comes together. Add the remaining flour (250g), gradually add the room temperature water, continue to knead the dough. You will notice the flour will absorb all the water, knead the dough until it is smooth. The dough should feel wet and smooth with hands. if the dough is too dry, gradually add a bit more water.

3. Boil water in a medium size soup pot, prepare a bowl of drinking water (room temperature) place beside. 

4. Divide the dough into three portion, one portion add a drop of red food colouring, knead until the colour mix well. Add a drop of pandan paste to another portion of dough, knead until the colour mix well. One portion of dough remain white.

5. Roll the three doughs into log and divide it into smaller balls. Roll it between palm to make it round, make an indention on the ball, fill it with a small ball of peanut butter filling. Wrap up the edge of the dough and seal, roll it between palm again to make round ball. Repeat until all dough is used.

6. Drop the balls into the boiling water pot in (3), when the Tang Yuan float on the surface, it means it is cooked, keep it in the boiling water for another 1/2 mins. Scoop the Tang Yuan out from the boiling water and place it in the bowl of drinking water. Let it be there until serving.

7. Prepare the soup: In a medium pot, add water, screw-pine leaves, a few slices of old ginger and brown sugar, bring it to boil. Set aside until serving time.

8. Serving: Scoop out three pieces of Tang Yuan to a serving bowl, place some ginger syrup in the bowl, serve warm. 

06 February 2018

Pineapple Tarts 2018 黄梨酥


Pineapple Tarts is another "must have" during Chinese New Year, it is one of my family favourite. I have to homemade the pineapple filling again this year as it is not available in Sydney. I'm using my previous recipe for the pineapple tarts pastry and filling with minor modification. 

With two big pineapples produced about 600g pineapple paste, standing in front of the wok for more than two hours is not an easy task especially have to endure the painful splatter from the boiling pineapple jam. However, the melt-in-mouth pastry will make you come back to bake this tart each year. :) The tip for a yummy pastry is using the best butter you can get, this round I'm using Golden Churn Pure Creamery Butter. 

Note: I hand made the pattern on each of the pastry using dough knife. 

Yield: 102 pieces (medium size tarts) 

Wishing you a Happy, Wealthy and Prosperous Chinese New Year! 

新年快乐!万事如意!


Recipe:
Ingredients for Pineapple Filling/Jam:

2 big pineapple puree, about 1.5kg (Blend the cut pineapple, no separation of pineapple juice with fibre)
2 tbsp of ground cinnamon
1 medium size lemon (wash and blend the lemon together with skin)
250g fine sugar (to taste, as some pineapple is very sweet and some may be a bit sour)
3 heap spoons maltose 

Method:
1. It is best if you have a big wok because the juice in the pineapple can dried off easily. Mix the pineapple puree with lemon puree, add ground cinnamon. 

2. Cook the pineapple-lemon puree on high heat until it is boiling, continue to cook for 30 mins before turning the heat to medium low. Add sugar, add maltose when the juice reduce to half. Continue to cook until the juice dried off and the pineapple jam turning very stiff (about 2 hours). Remember to stir the pineapple jam once in a while to prevent burning at the bottom. The pineapple jam has to fry until very dry so to produce a longer storage time for your pineapple tarts.
3. Cool down complete before keep in fridge for a day.
4. Roll into small balls, set aside for later use.

Note:
1. the cooking time may vary (mine is about 2 hours) as it is depends on the size of your wok and the juice contains in the pineapple.
2. The pineapple jam is not mean for spreading so the texture is a bit stiff so it is able to roll into a ball for the enclosed pineapple tarts. 

Ingredients for pastry: 
340g golden churn butter
80g icing sugar
4 egg yolks
4.5 tbsp ghee
1 tsp vanilla extract
1/2 tsp salt
550g plain flour
50g custard powder
1 tsp baking powder

1 lightly beaten egg yolk for glazing


Method:
1. Cream butter, ghee and sugar until light. Beat in egg yolks, one at a time. Add vanilla extract and salt. Beat until fluffy. 
2. Fold in sifted flour ingredients and mix into a firm dough. Put dough on a work surface and lightly knead until the dough is smooth.
3. Wrap with plastic cling and place in the fridge for 30 mins. Let the dough rest and bind.
4. Roll the pineapple jam into small balls.
5. Remove dough from fridge, divide dough using a teaspoon and roll into balls. 
6. Flatten a piece of dough and place a piece of the pineapple jam ball in the middle. Bring the edges of the dough together and press lightly to seal. Roll the dough between your palms to shape it into a ball. 

7. Place the pineapple dough on baking tray lined with parchment paper. 
8. Making pattern on the dough balls is optional.
9. Brush the egg yolk on the pineapple ball. 
10. Bake in preheated over of 180C and for ~20 mins or until it turned golden brown. 

11. Cool on wire rack before store in airtight container.