17 December 2012

Greatest Gift: Have a Blessed Christmas


Today is another day fill with love and I decided to pen it down to make it the closure post for year 2012. Two more days, all my stuff will be in the 40 footer container and this will be the the closure of my kitchen in Singapore. However, I anticipate the new beginning of my life in Australia with great hope and excitement than I can imaging. I have faith in God that whatever Jesus bring me in He will bring me through. Because of that, I'm so excited to see what future He have planned for me. If you ask me whether I will miss Singapore, the answer is a definitely yes. Singapore is the place where I build my family and career. Staying 14 years in this land, this is the place where I call it home. 

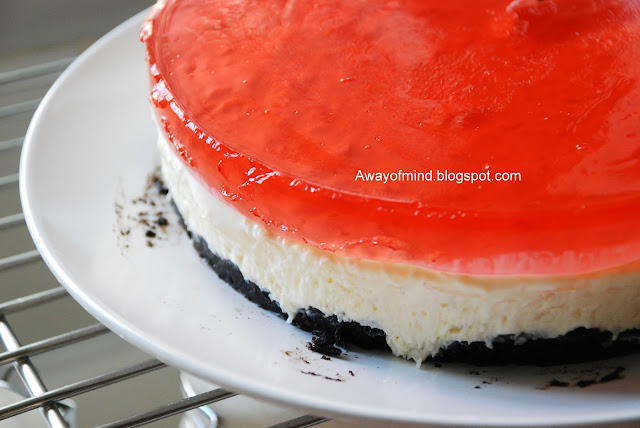
I baked the below jelly cheesecake sometime ago, using my previous recipe with Oreo biscuits and without strawberries :) 

And, I want to share the news about I received the cheque from Nuffnang! The first cash out since I start blogging!  It is so happy to share it will other blogger out there. I just change to become Nuffnang Glitterati member since July this year and as you know, I was busy shifting house and my posts was not as frequent as last time... and now because of relocation again, I won't be posting until everything settle down. Thank you Nuffnang for the advertisements. Thank you my blogger friends for always there when I come back to this place. 

Wish you all a Blessed Christmas and Happy New Year in advance! See you next year!


Recipe from The Sunday Times with changes:
6" round baking mould

Ingredients:
15 Oreo biscuits, crushed 
70g butter, melted
250g cream cheese, room temperature 
295g condensed milk
1/2 lemon juice
1 tbp gelatin
50ml hot water
One 90g box of Tortally raspberry flavoured jelly crystals

Step:
1. Crush the biscuits and mix in the melted butter in a bowl.
2. Pour the biscuit mixture into a round baking tin. Compact the biscuit mixture.
3. Chill in the fridge for at least 1 hour.
4. Beat the cream cheese until smooth using a whisk. Add condensed milk and lemon juice. Continue to mix.
5. Dissolve the gelatin in the hot water. strain it if there are insoluble granules. Add to cream cheese mixture and mix well.
6. Pour cream cheese mixture into the tine and spread evenly.
7. Leave to set in the fridge overnight.
8. Follow the instructions on the jelly crystals box to make the jelly solution. Let it cool to room temperature.
9. Pour jelly solution over the cheesecake. Place the baking tin back to the fridge until the jelly set.


30 November 2012

Steamed Vegetable Dumplings (Chai Kueh)


Mid of next month, the shipment company who provide relocation service will come to pack up all my stuff. I'm glad that my parent are visiting me before I leave. Saw some blogger making this steamed vegetables dumplings recently, I decided to make this for my parent, this is the first time they have chance to taste my chai kueh, I'm happy and hope there are more opportunity to come. I'm using my old recipe and double the ingredients to make 22 pieces. This round I make sure that I shredded the jicama and carrot properly and wrapping of the dumplings skin was smooth and easy one. The end result is a soft and crystal clear dumplings skin that doesn't harden when cool down.    


Recipe for filling from Ah Tze's Kitchen Play

Ingredients:
600g jicama, shredded
200g dried prawns, soaked and chopped
1 big carrot, shredded
4 tbsps sugar
2 tsp salt
2 medium bowl of water
cooking oil
80g chopped garlic
6 stalks of mushroom, chopped
some Chinese Spinach, washed and chopped

Method:
1. Heat the oil in wok, stir-fry garlic until fragrant.
2. Add in dried prawns and fry until fragrant.
3. Add in jicama, carrots and mushrooms. Stir fry for 5 mins, add in water. Let it simmer until the vegetable is soft and cooked. Add Chinese Spinach. Add in sugar and salt to taste. If you like me, prefer my vegetable to taste sweet to cover the raw smell of the jicama, you may add in more sugar. Let it cool for later use.

Recipe for dumpling skin adapted from Hot Favourites Kuehs and Pastries cookbook, with minor changes

Ingredients:
300g wheat starch flour
300g tapioca flour
500 ml hot boiling water 
2 tsp salt
6 tbsp cooking oil

Step:
1. Place wheat starch flour, tapioca flour, and salt in a bowl. Make a hole in the centre and pour in hot water. (the water must be boiling hot) Mix well with a pair of chopstick, mix to form a dough. 
2. Add oil and knead to form a smooth dough. (make sure to knead well so to produce soft dumpling skin) Cover with wrapping film, set a side to rest for 30 mins.
3.Rroll dough into long strip. Divide into 22 portions. Roll dough to form a thin circle.
4. Wrap 1 tbsp of filling with each dough. Fold into semicircle and seal the opening by pressing the edges together.
5. Line steamer with non stick baking paper or a piece of banana leaves. Place the chai kueh on top and steam for 10~15 mins or until the dumpling skin turns translucent.
6. Remove the chai kueh and brush the surface with some oil. Serve hot.


My Father enjoying the homemade steamed vegetable dumplings 

26 November 2012

Hokkaido Chiffon Cupcakes


These few days I was very busy with lots of decisions to be made. The trip to Melbourne was a fruitful and happy one. End of this week, my family and I will be flying to Perth, by then, lots of decisions pending us again. 

Tomorrow is my birthday, I baked this Hokkaido Chiffon Cupcakes which is very popular among blogger, I used the recipe from Sonia,  Nasi Lemak Lovers which she adapted from Forbidden Garden, like what she recommended the taste of this chiffon cupcakes is light and soft! However, my chiffon cupcakes was not perfect because it shrinks when I took it out from oven :( I think I over whisk the batter, for sure I will try out this recipe again. Do hop over to see Sonia beautiful Hokkaido Chiffon Cupcakes.

Not sure whether I still got time to bake anything this year, I may not be able to post anything until I settle down in Australia next year. If everything go smoothly, I will be relocated to Australia by next Feb. Bye! 


Recipe adapted from Nasi Lemak Lovers
Ingredients:
3 egg yolks
20g sugar
35g corn oil
60g milk
70g cake flour

3 egg whites
25g sugar

filling:
60g whipping cream
10g sugar
1 tsp instant custard powder
icing sugar for dusting

Method:
1. Pre-heat oven to 170C
2. Arrange paper liners on baking tray.
3. Hand whisk egg yolk and sugar till pale in colour.
4. Add corn oil and milk, mix well.
5. Sift in cake flour, stir to combine.
6. Beat egg white till foamy, gradually add sugar and beat till soft peak form.
7. Take 1/3 of meringue and use a hand whisk to mix into egg yolk batter.
8. Fold in the balance egg white with a spatula till well combine.
9. Scoop batter into paper liners to about 3/4 full.
10. Bake for 20-25 mins at middle rack.
11. Beat whipping cream with sugar till firm and stiff over a bowl of iced cubes.
12. Add in custard powder and mix well.
13. Pipe custard cream into cupcake and dust with icing sugar. Refrigerated before consume. 


Attached also my son first stage performance at Canadian International School on the Kindergarten Graduation Day (23/11/2012). His nursery teachers had played a big part in his learning journey. My boy enjoyed himself and The Learning Ladder teachers accepted who they are. With only one rehearsal before the day, he is doing very well! A big step forward for this 4.5 years old boy. The words "brave boy" 勇敢的孩子 from the teachers meant a lot to him. Thank you teachers for your encouragement! 


05 November 2012

Nata De Coco Grass Jelly with Rose Syrup and Lime


When there's friends come over, how you prepare a dessert or a drink in a easy and hazard hassle free way? This is the one :) Nata De Coco Grass Jelly with Rose Syrup and Lime, it tastes refreshing with that bit of sharp flavour from calamansi lime and I believes it will be the talking point among friends for a while :) I simply love biting the springy nata de coco and grass jelly while smelling fragrance of roses and at the mid-time having that bit of sourly in my tongue :)


I always store up a pack of two Nata De Coco and Grass Jelly at home because...yes, you are right! Is Gabriel favourites again :)
Note: I'll be away for holidays until 19 Nov 2012. See you soon :)


Recipe from Ah Tze's Kitchen Play

1 medium pack of sweeten grass jelly, cut into small cubes
1 pack of nata de coco (whichever flavour you like)
2 calamansi limes, halved
4-5 tbsp rose syrup (if you wish the drink to be sweeter, add more)
lot of ice cubes
100ml water

Method:
1. In a medium bowl, pour in nata de coco and grass jelly cubes, add 4-5 tbsp rose syrup, stir well.
2. In a serving glass, add some ice cubes, scoop the nata de coco and grass jelly into glass, add a bit of water and squeeze a bit of lime juice into glass and serve the lime halves on the side.
3. Taste the drink, you may add a tbsp of rose syrup into drink if you wish to have a stronger rose fragrant.  


04 November 2012

Simmered Dried Scallops with Cabbage


I saw this recipe on FaceBook posted by "Cooking is Easy" (做饭很简单)like the way it used the saltiness of scallops to bring out the sweetness of the cabbage. I give the recipe a twist by adding dried shrimp, you are able to cook this dish using Tianjin Cabbage as well.  
 
My son usually doesn't like to eat cabbage but he gave this dish a try, I think simmering of cabbage instead of frying it does help to soften the vegetable. The sauce of this dish is very flavourful, scallop the expensive stuff does help :) 100g of Japanese scallops equal to about 6 pieces cost me $13 Singapore dollars!! If you can effort, add more scallops in this dish :D

01 November 2012

Marble Chocolate Wheel Bread 大理石车轮面包 (65C Tangzhong Method)


Yesterday I used a famous baker recipe to make this bread but it turned out a disaster, the chocolate filling melted, and the bread was with wheel of hollows...haha, just right for Halloween huh!
 
Today, I bake this Marble Chocolate Wheel Bread again using my previous Chocolate Marble Bread Toast recipe (original from Japanese baker Matumoto Youiti 松本洋一) This bread didn't disappointed me. This round I remember to measure how much tangzhong I used and also how much liquid added. Hope it will help those who wish to give this recipe a try :)

31 October 2012

Happy Birthday WT


Happy Birthday WT!
May Lord give you a vision for our future. Fill you with the knowledge of His will in all wisdom and spiritual understanding, so that you may have a walk worthy of Him, fully pleasing Him.
Submitting all your dreams and desires to Him by knowing that "the things which are impossible with men are possible with God"  May Lord our God give you the certainty that even in your most hopeless state, when you finds it impossible to change anything, our Lord, can change everything for you. Amen.


29 October 2012

Salvage Disaster


May be I was a bit too ambition, a 4" tall cake stacked up by two layers of chocolate sponge with a super thick 1/2" whipping cream in between. May be a bit of lazy and careless are intolerable totally when come to baking.
 
I used two 6" mould pan with a bit difference in design. OK, I know but there is the only two 6" mould pan I have! I need two layers of sponge and lazy to do the cutting...So you see, when stacked up the sponge, one projected a little bit more, another one just that bit smaller than the other...haiz...

22 October 2012

Indonesian Batik Agar-Agar (Indonesian Batik Jelly)


I still remember when I was in primary school, when come the time for year end class party, my mother always make me a tray of agar-agar (Jelly) to bring along. Sometime the agar-agar was in pink where she added rebina or, in orange where she added orange juice. Simple and plain...but all my classmates including me enjoyed the agar-agar so much.
 

19 October 2012

Kuih Talam


I bought the pandan leaves (screwpine leaves) since last week, can't decide what I wanted to do with it until today. The baking mood is up and I know I want to make Kuih Talam (Steamed Coconut Pudding) again. 

Kuih Talam is my all-time favourite kuih since childhood. It has two distinctive layers in term of taste and texture. The top layer which make of coconut milk, salt, tapioca flour and rice flour, taste salty and the texture should be softer than the bottom screwpine layer. The bottom screwpine layer which consist of green bean flour, tapioca flour, rice flour and sugar, taste sweet and the texture should be slightly firm but still chewy to bite. The flavour of both layers complement each other.


My first Kuih Talam was in 21 Oct 2011, it is nearly a year. The texture of the bottom screwpine layer for my first Kuih Talam was a bit soft, this round of kuih making I'm using another recipe. The result come out satisfying. However, I still think the texture of the bottom screwpine layer still not complete what I desire.


Recipe adapted from Hot Favourites Kuehs & Pastries Recipes Book
Ingredients for Base Layer:
10 pieces pandan leaves (blended with 600ml water, strain)
1/2 tsp lye water (omitted)
100g rice flour
75g tapioca flour
20g green bean flour
200g sugar (used 150g)
2 drops green food colouring (using the homemade pandan paste)

Ingredients for Top Layer:
200ml thick coconut milk
100ml water
50g rice flour
20g tapioca flour
1/2 tsp salt

Method:
1. Base layer: Sift rice flour, tapioca flour and green bean flour together. Add in 500ml pandan juice, sugar and pandan paste, and mix well. Cook the mixture over medium heat till it turns thick and sticky. Stir constantly. Pour mixture into steaming tray and steam over medium heat for 30 mins till cooked.
2. Top layer: Mix thick coconut milk and water together. Sift rice flour and tapioca flour together. Add in coconut milk mixture and salt, and strain. Cook mixture over low heat till it turns thick and sticky. This should take about 4-5 mins. Stir constantly.
3. When base layer is cooked, gradually pour the top coconut layer over, continue to steam the whole kuih over high heat for about 2 mins. Set aside to cool, it will be good to refridgerate it a few hours before cutting.


To prevent the kuih from sticking to the knife while cutting, you must first dipped the knife into cold water.  


17 October 2012

Cranberry Cinnamon Rolls (Gelatinized Dough Method) 蔓越莓肉桂卷


This afternoon, I missed you ...my soft bread.

It is you who pushed me into the kitchen and I tried my best to make this creation again. Time flies, it has been more than a year since I baked my Cinnamon Rolls using Angie's Hakkaido Milky Loaf recipe. Again, the result is rewarding and satisfactory! 

It is Gabriel first time trying out a bread with cinnamon flavour and he loves it. I think the credit mainly goes to the rich creamy milk flavour of the bread. When WT tasted the roll, his eyes wide open and said this is better than the one selling. Haha...it make my day. It is down pour outside but it doesn't affect my mood to enjoy my afternoon tea.


I had a date with my Cranberry Cinnamon Rolls this afternoon, and it was beautiful! If you love soft bread like me, give this recipe a try!


Gelatinized Dough Ingredients:
250ml milk
50g bread flour

Method:
1. In a bowl, add milk then stir in flour.
2. Bring batter to gas stove, on medium heat cook and stir until the batter thicken.
3. Leave the gas stove once the batter thicken, continue stir until swirling batter.
4. Once cool, the dough can be used directly, if saving in refrigerate has to use within 3 days.

Recipe adapted from Angie's Recipes
Ingredients:
50g whipping cream
1 egg
pinch of salt
55g sugar
30g milk powder
350g bread flour
50g rye flour (omitted as I added 50g of bread flour)
7g dry instant yeast
30ml milk
120g Gelatinized dough
30g unsalted butter
10-20ml olive oil

Filling ingredients:
100g dry cranberry (chopped)
4 tbsp cinnamon sugar


Method:
1. Place all bread ingredients into the mixer (except butter and milk), using bread hook, low speed, mix the ingredients until forming a rough dough, pour in milk and continue mixing with medium speed until dough becomes smooth.

2. Add in butter. Mix the dough with medium speed, touch the dough to check whether it is too dry. The dough should feel soft and not sticky to hand. Add in the olive oil, and continue mixing until the dough is able to form smooth elastic film. (add a bit of chopped dry cranberry into the dough if you wish)

3. Roll the dough into ball, spray water on the surface and cover it with damp cloth. Let it proof for 1 hour (or until 2 times bigger)

4. Once proofing complete, use hands to punch out air. Flatten the dough into a rectangle shape about 12"x10"

5. Sprinkle with a bit of water on the dough surface, top with cinnamon sugar and dry cranberry. Roll up the dough from the side into a cyclinder and cut the dough into 2" section. Cut side up and arrange the dough in prepared baking pan.

6. Let it proof for 30-45 mins or until the dough double in size. Egg wash the surface, and bake at 180C for 40 mins.

7. Immediately turn out the bread from pan when it is done.


30 August 2012

Chili Anchovies Buns (Gelatinized Dough)


I am still in the midst of packing up my stuff for the big move, 80% of my stuff is in the boxes and my kitchen is close to "empty" :) Looking at the bare and neat kitchen, suddenly I have a taught of wanting my kitchen to be always in this kind of minimalist stage. Is like clearing all the clutter out of my soul and wanting to live a more healtier life by eating less sugar, salt, and excersice more. Haha... lossing 2 kg for me seems mission impossible (btw, I'm not really "fat" but wanting to reduce from 52kg to 50kg) just wonder how some can do it within a short period.
This bread was make months ago, I improvised my leftover pulut panggang filling by adding some anchovies to make chili anchovies bun filling. The bun tastes lovely with the grated coconut in it. Hope you don't mind seeing my old recipe again :)


Ingredients for making gelatinized dough
100g bread flour
70g boiling water

Steps:
1. Add the boiling water into flour, mix until well blended to form dough. Cover and set aside to cool. Keep it into refrigerator for at least 12 hours.

Ingredients for filling:
3 tbsp Woh Hup sambal shrimp paste
100g anchovies
1 tsp sugar
3 tbsp oil
100g pulut panggang filling (ingredients B and C)


Steps:
1. Add oil and anchovies, fry until anchovies is crispy. Add sambal shrimp, sugar. Add the 100g pulut panggang filling. Add a bit of water if it is too dry. Stir well, set aside to cool.


Ingredients for bread
300g bread flour
100g plain flour
50g sugar
20g milk powder
175g cold water
9g instant yeast
1 egg
50g butter

Steps:
1. Mix all dry ingredients for bread until well blended. Add water and knead to form rough dough. Add in 100g gelatinized dough and knead until well blended. Add in butter and knead to form elastic dough. Cover and let it proof for 1 hour.
2. Divide the dough into the number of breads you want (for my case, I made 8) Let it rest for 10 mins.
3. Flatten the dough and roll it into round disc, stuff in the filling, wrap up. 

4. Let it proof for 35 mins, glaze with egg.
5. Place in the middle shelve of the oven, bake at 180C for 25 mins. or until brown.