31 March 2016

Danish Butter Cookies 2016 丹麦牛油饼干


This week I have a few baking to do. This Danish Butter Cookies recipe never fail me, it produces buttery and crunchy texture, my previous baked was sprinkled with coarse white sugar, this time I sprinkled the cookies with raw sugar. Thank you again Ann, for the recipe and cookies cutter. 

Yield 52 pieces.


Recipe from Anncoo Journal

Ingredients:
1 egg (60g) lightly beaten 
200g soft butter (Lurpark butter, room temperature)
320g sifted plain flour
130g sifted icing sugar
2 tbsp vanilla extract
some coarse raw sugar for sprinkle

Method:

1. Place very soft butter and icing sugar in the mixing bowl, use a spatula to cream the butter together with the sugar. Add in the lightly beaten egg, vanilla extract and flour. Mix it to form a rough dough.
2. Flatten the dough between two sheets of cling wrap with a thickness of 4~5 mm. Cut the dough with your cookies cutter.
3. Place the cookies dough on the baking tray, sprinkle with coarse sugar.
4. Bake in the preheat oven at 200C for 14 mins. or until it turned golden brown (Depends on your oven)
5. Leave the cookies to cool completely before store in airtight container. 

26 March 2016

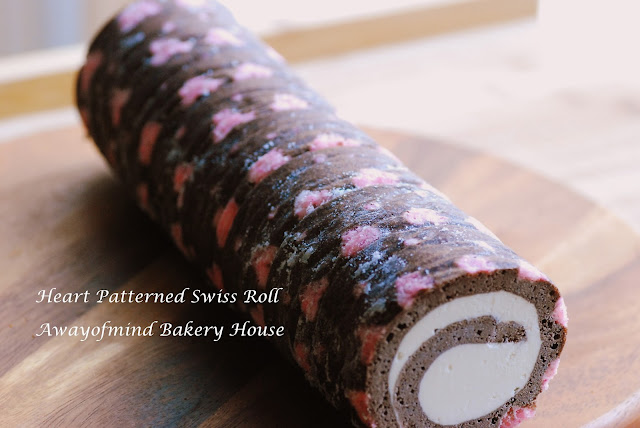
Heart Patterned Swiss Roll (with Spinach Juice) 爱心可可菠菜蛋糕卷


These few days trying out something new in my Swiss Roll making. I added spinach juice to my Heart Patterned/decorated Swiss Roll. It makes me feel happy to know my family is taking some vegetable juice while munching on a sweet dessert. 

You hardly notice the taste of spinach in the Swiss Roll. For this kind of decorative Swiss Roll making, my advice is be patient while doing the heart patterned drawing, I nearly gave up as there were too many little hearts to draw! But the end result is so charming, my son is happy to see the Heart Patterned/Decorated Swiss Roll! As usual I freeze the Swiss Roll to form its shape before cutting. Let the Swiss Roll sit 20 to 30 mins at room temperature before consume will restore the Swiss Roll to soft and fluffy chiffon texture. 

Happy Easter! 


Recipe: (12" x 12" square baking tray)
Spinach juice:
3 cups of chopped spinach
300ml water

Heart patterned batter:
50g butter, cut into cubes
50g icing sugar
50g egg whites 
50g plain flour
a drop of food colouring 

Chocolate Sponge batter:
4 egg Yolks
30g fine sugar
30g dark cocoa powder
70g cake flour
40ml corn oil
1/2 tsp vanilla essence
75ml spinach juice

Meringue:
4 egg whites
45g fine sugar

Filling :
300ml thickening cream
2 tbsp fine sugar

Method:
1. Prepare the spinach juice: Blend the chopped spinach with water, filter the spinach juice to separate the fibre from the vegetable juice. Set aside the vegetable juice for later use. (I used the spinach fibre to cook my pasta)

2. Prepare the heart patterned batter: Cream the butter with icing sugar using electric mixer until creamy. Add egg whites, mix well. Then stir in the flour. Mix until it turned into thick paste, add food colouring. Place the batter into pipping bag, pipe out the heart shape pattern on a lined baking tray. Freeze the pattern together with its tray for at least an hour. 

3. Prepare Chocolate Sponge batter: In a mixing bowl, add 4 egg yolks and sugar. Using a hand whisk, whisk the egg sugar mixture until light. Add vanilla essence, oil and 75ml spinach juice. Mix well. Then add the dark cocoa powder and cake flour. Mix well until there is no flour lump in the mixture. Set aside.

4. Prepare the meringue: Place 4 egg whites in a bowl, using electric mixer medium speed mix until the egg whites starts shown bubbles, add in half of the sugar. Change the electric mixer speed to high, mix until it double its volume. Add in another half of the sugar, mix until stiff peak form. 

5. Scoop out 1/3 of the meringue and place it into the chocolate sponge batter mixture, stir well until it combined. Then FOLD in the remaining meringue to the chocolate sponge batter mixture in TWO batches. FOLD well. 

6. Take out the baking tray with heart patterned from the freezer, pour the chocolate batter on the baking tray. Level the batter and knock the baking tray on the worktop twice to release the air bubbles trap in the batter. Bake in preheat oven at 170C for 14 mins (lower rack).

7. Once the sponge is done. Take it out from the oven, pull the cake sponge out from the baking tray and let it cool down on a wire rack for 2 mins before flipping the cake sponge heart patterned side up. Peel away the parchment paper, and let it cool down. Cover the cake sponge with parchment paper to keep the cake sponge moist. Set aside.

8. Prepare the filling: In a clean bowl, using electric mixer mix the thickening cream with sugar using until stiff peak. 

9. Assemble the Swiss Roll: Flip the cake sponge with heart patterned side down, apply a thick layer of thickening cream on the cake sponge, roll it up Swiss Roll style. Wrap with parchment paper and keep in freezer for a few hours before cutting. Let the cake sit at room temperature for 20 to 30 mins before serving. 


18 March 2016

Tiger Skin Swiss Roll 虎皮蛋糕卷


I wanted to make this Tiger Skin Swiss Roll for long, eventually I fulfilled another target set for myself. I have done some searches through the Internet, Victoria Bakers's Tiger Skin Swiss Roll looks promising, but eventually I changed my mind to stick to egg separation method, the method which I'm more confident of. However, I'm thankful for all the steps stated in her blog. 

Yes, here you are the Tiger Skin Swiss Roll using egg separation method!  Using 12' x 12' square baking tray. 4 eggs. Yummy! Yummy! ^^ One slice of my little tiger roll didn't want to corporate with me while I'm taking the photos, it kept slanting to a side!!! 


Recipe:
Chocolate Swiss Roll:
4 egg Yolks
30g fine sugar
30g dark cocoa powder
70g cake flour
40ml corn oil
1/2 tsp vanilla essence
60ml milk 

Meringue:
4 egg whites
45g fine sugar

Filling :
300ml thickening cream
2 tbsp fine sugar

Tiger pattern:
4 egg yolks
30g fine sugar
5g cornstarch 


Method: 
1. Prepare the Chocolate Swiss Roll: Beat the 4 egg yolks and sugar in a bowl until creamy and light. Add the vanilla essence, corn oil, mix well. Sift the flour and cocoa powder in the bowl in batches, alternate with adding milk. Mix well. Set aside.

2. Prepare the meringue: In a clean bowl add 4 egg whites, use the electric mixer medium speed to beat until bubbles, add in half of the sugar. Mix with high speed for a min then add in the remaining sugar, beat until stiff peak which the meringue didn't drop while the bowl is turned upside down. 

3. Take 1/4 of the meringue and mix it together with the chocolate cake batter. Mix well. Then FOLD in the remaining meringue to the chocolate cake batter in 3 batches. Pour the batter into the lined baking tray and bake at preheat oven at 170C for 12-15 mins (depends on your own oven, the temperature and timing may varies a bit)

4. When the cake is done, take it out from oven, flip the cake to a wire rack to cool down. Cover with parchment paper to keep the cake moist. 

5. Prepare the Tiger skin pattern: Place the 4 egg yolks, sugar and corn starch in a bowl, use the electric mixer at high speed whisk for 5 mins. Then reduce the speed to 1 or low and whisk for 1 to 2 mins. Spread the batter on to the 12' x 12' lined baking tray, GRILL at preheat oven at 220 for 3-4 mins or until the pattern appeared. When done, take out the cake, let it cool down a bit before flip the cake on the wire rack, remove the parchment paper at the bottom of the cake. 

6. Prepare filling: In a clean mixing bowl, add thickening cream and sugar, whisk with electric mixer until it thickened. Spread some of the filling on the chocolate cake sponge, roll up Swiss roll style. Set the cake aside. Then spread some of the filling to the Tiger skin pattern (with the pattern side down), place the chocolate Swiss roll in the middle of the Tiger skin pattern sponge. Wrap it with seal side down. Use a parchment paper to cover the cake and keep it in the freezer for at least 4 hours before cutting. Bring back to room temperature for 30 mins before serving. 


17 March 2016

Hot Cross Buns (65C Water Roux / Tangzhong Method)


There was a Kookaburra came knocking at my glass window this morning, not once but three times! I thought I heard something bumped on my kitchen window, then I saw the Kookaburra, flew from far and hit on the same window again then another time! 

Easter is coming, baked this soft chocolaty hot cross buns! I tried a recipe using sponge dough and no yeast in the main dough, but it didn't turn out well. Then I tried to bake with water roux method. The bun texture turned out to be soft to my liking, if you like soft bun this recipe is for you.

Yield 13 pieces.


Recipe: 

Water roux:
30g bread flour
150g water

Bread dough:
300g bread flour
55g plain flour
45g cocoa powder (3 tbsp)
80g sugar
7g instant dried yeast
1 tsp All spices powder / Cinnamon powder
1/4 tsp fine salt
130ml-150ml warm milk (gradually add)
1gg
50g raisin, soaked in hot water for 10 mins then drained
50g cold butter, cubes
80g chocolate chips

Cross batter:
2 tbsp icing sugar
2 tbsp flour
1.5 tbsp warm water

Glaze:
1 tbsp honey
1 tbsp hot water

Method:
1. Prepare water roux: Mix bread flour with water in a small saucepan, heat up under medium heat to 65C (start bubbles), remove from heat, keep stirring until the mixture thicken. Cover and let it cool down.

2. Prepare the bread dough: Place the butter cubes, bread flour, plain flour, cocoa powder, spice powder/cinnamon powder, into a big mixing bowl, rub in the butter until all mixture resembles fine bread crumbs. Add sugar, salt, egg and dried yeast into the mixing bowl. Add water roux. Stir the mixture with electric mixer using low speed for a min. Then gradually add the warm milk (you may not need to add all the liquid, it depends on the flour you use) Knead the dough until the dough form elastic film. Add chocolate chips and knead in the chocolate chips to the dough using hands.

3. Let the dough proof to double its size, about 40 mins, depends on the weather. 

4. Prepare the cross batter: in a small bowl, mix icing sugar, flour and warm water together to form thick paste. Place in a small piping bag.

5. Punch down the air in the bread dough. Divide the dough into 13 pieces (it depends on the baking tray you use). Roll the dough into round and arrange them into your lined baking tray. Let it proof for 30 mins. 

6. Pipe the cross batter on the bread dough, bake in preheat oven at 180C for 18 mins.

7. Remove bread from the oven, brush the glaze on top. Let it cool down on a wire rack. 


11 March 2016

Giraffe Patterned Swiss Roll 长颈鹿蛋糕卷


It has been a while since the last time I bake a Swiss Roll. This morning making a Swiss Roll with giraffe pattern. My Swiss Roll is not the perfect roll, it cracks a bit on the sponge when I was rolling it up, thank God it doesn't break apart^^

I'm following the instruction and recipe from Masam Manis. Just that, I used milk instead of water and omitted cream of tartar from the recipe. A step is changed to suit my usual way of making chiffon roll, so that the cocoa powder is dissolved evenly in the batter.


Recipe:
A. For batter
3 egg yolks
15g caster sugar
60ml water (used milk)
40ml oil
75g cake flour
1/2 tsp vanilla extract

B. For Meringue
3 egg whites
50g caster sugar

C. For Cocoa batter
8g dark cocoa powder
1tbsp cocoa emulco

D. For giraffe pattern
1 egg white
2 tsp caster sugar
1 tsp cake flour
2 tbsp batter A that has been separated out

E. For filling
300ml whipping cream
some sliced peaches (in syrup can food)


Method:
Prepare the baking tray: Grease the baking tray and lay over the parchment paper which you have drawn with giraffe pattern. Apply a layer of oil on the parchment paper. 

1. Hand whisk 15g sugar and 3 egg yolks in a bowl until creamy. Add vanilla extract, milk and oil, stir well. Add the sieved flour in two batches. Mix well until no lump. Take out 2 tablespoons of batter, set aside for later use.

2. Using electric mixer, beat the 3 egg whites until bubbles, add the sugar in two batches until you get the stiff peak meringue. Take 1/4 of the meringue and add to the step 1 batter. Add the 8g dark cocoa powder and cocoa emulco, mix well until all incorporated. Then Fold in the remaining meringue to the batter. 

3. In a medium bowl, hand whisk the egg white and 2 tbsp sugar until soft peak. Add cake flour, mix well. Add 2 tbsp of batter A that has been separated out at the beginning. Place the batter in the pipping bag, make a small snip at the tip of pipping bag, pipe out the giraffe pattern. 

4. Bake at preheat oven at 170C on the bottom rack for 1 min.

5. Take out the baking tray and pour in the step 2 cocoa batter, smooth the top and tap the baking tray to release any bubbles trap between. Bake at preheat oven at 190C on the bottom rack for 12 mins (time and temperature may varies depends on the capacity of the oven)

6. When the cake is done. Take it out from the oven, flip the cake on a cooling rack and let it cool down completely. 

7. Using the electric mixer, whip the whipping cream with 1 tbsp of sugar, until it double the volume. 

8. Flip the cake, with giraffe pattern side down. Spread the whipping cream on the cake, arrange the sliced peaches on the middle part. Roll the cake up. Keep it in the freezer for at least 4 hours or until the filling is harden, before cutting. 


10 March 2016

Panda Bread 熊猫面包


This morning I made the panda bread. I watched a few panda bread making videos on the Internet before I set my hands to start the bread making. I find the one able to produce soft bread texture, to Asian's taste on white bread is the video uploaded by Gobby Hong. (Her video is in Cantonese) 

I didn't follow her recipe, as I saw her bread loaf was not able to fill up the loaf tin. I used my own recipe. For this bread making I didn't measure the dough, all dough were divided by estimation. 


The dough is divided into three dough. (See the first picture collage) The green tea dough is equal to the size of plain white dough. The dark cocoa powder dough is 1/3 of the size of green tea dough.

After that, the cocoa powder dough has to divide into four equal portions. The green tea dough has to divide into one big and one small (just enough to place between the ears, cocoa dough) The plain white dough has to divide into three dough with one big, one medium and one small (just enough to place between the eyes, cocoa dough)

Verdict: I know my son will not like the bitterness of green tea, I only add 3g of matcha powder to the bread. The soft bread texture is with a hint of green tea fragrance but you hardly able to taste the bitterness of green tea. And there is dark cocoa flavour on some parts of the bread, of course it is from the panda's eyes and ears! :) Hope the kids like their afternoon tea! :) 

Follow closely the instructions given, you will get the successful panda bread too!


Recipe: 
330g bread flour
70g all purpose flour
30g white sugar
220ml milk (gradually add)
1/2 tsp salt
1 egg yolk
10g instant dried yeast
18g butter
3g matcha powder (later add a few drops of milk to mixed together with the dough)
8g dark cocoa powder (later add two drops of milk to mixed together with the dough)


Method:
1. In the KitchenAid mixing bowl, add bread flour, all purpose flour, instant dry yeast, salt, sugar, and one egg yolk. Using low speed (speed 1), mix for a min, gradually add milk. Switch the speed to 2, mix the ingredients until it comes together to form a rough dough. Add the butter pieces, let the Kitchen Aid knead the dough at speed 4 until the dough form elastic window pane. (Important to get the elastic window pane)

2. Divide the dough into three portions, with two equals big portions and one small dough just 1/3 size of the big portion.  

3. Grease a bowl with cooking oil, place the plain white big dough in it, cover with plastic cling and let it proof to double its size.  

Add green tea powder to the remaining big plain white dough, add a few drops of milk to it, knead until the green is even. Grease another bowl, place the green tea dough in it, cover with plastic cling and let it proof to double its size. 


Add the dark cocoa powder to the small plain dough, add two drops of milk, knead until the brown is even. Grease another bowl, place the dark cocoa dough in it, cover with plastic cling and let it proof to double its size. 

4. Punch out the air in all dough. Take the green dough, flatten it into rectangle shape. Cut out a small portion of green dough (just enough to sit between the two cocoa dough, as shown in photos) The length of the dough has to be the same as your loaf tin.   

5. Divide the cocoa dough into four portions. Roll it into log, the length of the loaf tin. Place two cocoa dough strips in the middle of green rectangle dough with an inch apart from each other. Place the small strip of green dough in between two cocoa dough.

6. Divide the plain white dough into three portions with two big dough nearly the same size (one bigger than another) and the third dough is just 1/3 of the big dough. Roll the small white dough into the length same as your loaf tin.

7. Flatten the big plain dough into rectangle shape. Lay it over the green rectangle and two cocoa dough as shown in photo. Place two more cocoa strips on top of the white dough with an inch apart from each other. Place the small white dough between two cocoa dough. Roll the medium size plain dough into a log same length as your loaf tin. Stack it on top of the small white dough in between two cocoa dough. 

8. Wrap up the big white rectangle dough, seal the dough properly. Then wrap up the big green rectangle dough and seal the dough properly. Place it in the grease loaf tin, seal side down and proof until it reach 90% of the height of your baking tin. 

9. Bake in preheat oven at 190C for 25 mins. (The time and oven temperature varies depends on your oven capacity) 

Slice the bread only after the loaf is completely cool down. 


05 March 2016

Egg Tarts 蛋搭


Baking egg tarts for a gathering this morning. Now, I'm impressed with the "Westinghouse" oven because the heat distribution is good, there isn't any hot spot or burn on the surface of the egg tarts! 

Making 28 pieces (7 cm mould) this round.   


Recipe:
Crust:
400g plain flour
3 tbsp custard powder
3 tbsp milk powder
230g butter, cold, cut into cubes
1.5 tbsp sugar
2 eggs, beaten
2 tbsp water

Filling:
350ml water
130g sugar
4 eggs, beaten
100g evaporated milk
1 tsp vanilla extract

Methods:
1. For filling: Boil the water and sugar in a pot, stir well until the sugar dissolved. Set aside to let it cool completely. Add in beaten eggs, evaporated milk, and vanilla extract. Sieve the liquid three times, set aside for later use.


2. For egg tart crust: In a mixing bowl, sieve the flour, custard powder and milk powder together. Add the sugar, place the butter into the bowl, rub in the butter with flour mixture using the fingers until the mixture look like course bread crumbs. 

3. Make a well and add the beaten eggs mixture. Use the hands to form soft dough, if the dough is too dry, add one or two tablespoons of water. Do not over knead the dough. Wrap the dough in plastic cling and chill in fridge for 30 mins.

4. Divide the dough into small balls, place a dough ball in the tart mould and press the dough from the centre to the rim. Poke a few holes on the dough using fork. Repeat for the remaining dough. Place the tart dough into the fridge and chill for another 15 mins. 

5. Pour in the filling into each tart mould. Bake at preheat oven at 180C, bake for 25 mins. (Depends on the oven capacity)  

Note: Watch closely the egg tarts in your oven after 23 mins. If the egg tarts filling is not in liquid form, the egg tarts is ready. However, if the centre of the filling still wobbly, bake for another min. 


04 March 2016

Hakka Yam Abacus Seeds 客家算盘子 2016


Life can be easier if without people who think they are more superior than other. Don't you agree with me? Come back to my kitchen and blogging about my homemade food is always a happy "me" time. 

I bought the yam few weeks back, made the chewy and bouncy yam abacus and frozen it until today. As it is Friday, I keep my dish as simple as I can. Yes, tonight the two boys will be happy to see this on their dinner table! 

I'm using the same recipe.


(yield: 4 plates)
Ingredients for yam abacus seeds:
800g steamed yam, mashed
400g tapioca flour
1 tsp salt
250ml boiling water 
2~3 tbsp corn oil

Ingredients for stir-frying the yam abacus seeds:
4 clove garlic, minced
4 shallot, sliced
4 tbsp dried shrimp, soaked and finely chopped 
250g minced meat 
6 mushroom, soaked and thinly sliced 
6 black fungus, soaked and thinly sliced 

Seasoning:
3 tbsp fish sauce
1 tbsp dark soy sauce
a dash of peppers

pinch of salt (to taste)
1 tbsp sesame oil

Some cooking oil
250ml water


Method:

1. Mix all ingredients together and knead till the dough able to form soft smooth dough. Make sure the flour is well incorporated. (If the dough is very wet, add more tapioca flour)
2. Wet the hands with some cooking oil (to prevent the dough stick on hands), divide the dough into small balls. Press your thumb print for the imprint. (if you are not consuming it, you can frozen the dough at this stage)
3. Boil a pot of water with a dash of oil in it.
4. Add the abacus seeds one piece at a time to prevent it from sticking together.
5. Once the abacus seeds is floating, it is cooked. Drain the water and put the abacus seeds into a bowl. Add some oil to prevent it from sticking.
6. Stir-fry the yam abacus seeds: Heat cooking oil and saute shallot and garlic till fragrant. 
7. Add dried shrimps and continue to fry till fragrant.
8. Add minced pork, mushroom, black fungus and fry till everything is thoroughly mixed.
9. Add seasoning and water, bring to boil. 

10. Add the abacus seeds and stir fry till the liquid dried up. Serve hot.