14 July 2015

Qatar Karak Tea 卡达尔咖乐茶


Karak Tea is the popular spices Arabic drink which believe to be originated from India. The Qatar Karak Tea is not as spicy as what we get in the Indian Masala Chai Tea, there are varies version of Karak Tea with endless possibilities in the use of spices to suit your taste bud. 

The basic common ingredients used are: black tea, condensed milk or evaporated milk, sugar and spices. Some people like to add spices such as ginger, cardamon, cinnamon, star anise , peppercorn, nutmeg or cloves. As for my family, I add saffron and little sugar in it. In Qatar we can get a special evaporated milk that comes with cardamon flavour, most people believe it's to cater for the local drinking culture. 

This should be the last post before I break for my summer holidays and wishing all Muslim friends and readers Happy Eid Mubarak in advance!

今天就来杯卡达尔文化的咖乐茶,这是源自印度的阿拉伯香料茶。如果拿卡达尔的咖乐茶和印度的麻撒拉彩茶比较,后者是扁辣的。当地人喜欢在茶里变动和加添香料,使一杯原本普通口味的咖乐茶变成有无尽又多元化,在口味方面来配合每一个人不同的需求

大致上泡一杯咖乐茶得用上:红茶,练奶或淡奶,糖和香料。有人喜欢在茶里加姜,豆蔻,肉桂,茴芹,胡椒粒,肉豆蔻或蒜瓣。我喜欢在茶里加藏红红粉和一点糖。在卡达尔我们可以买到添加了豆蔻的淡奶,听说是厂商特别为当地人的喝茶习俗而提供的。要先说的是,这可是一杯会口味留香的重口感咖乐茶哟。

我将放暑假去了,预祝大家假期悦快!


Yield: 4 glasses of small Karak Tea
Ingredients:
15g Black tea (used Red Label tea)
200ml hot water
50ml evaporated milk (Rainbow brand with cardamon)
a pinch of saffron
sugar (to taste)

Method:
Put the black tea in a small tea bag, place the tea bag in the tea pot, add saffron. Pour in the hot boiled water, add evaporated milk and sugar (to taste). Stir well to dissolve the sugar before serving.


This post is linked to the event Little Thumbs Up (July 2015 Event: Tea

and hosted by Cheryl of Baking Taitai

13 July 2015

Sheng Jian Bao / Shui Jian Bao (Pan-Fried Pork Bun 生煎包/ 水煎包)


一转眼又到了七月,这一个夏季是有那么多的期待!
希望脚下可以踩着碧绿的大地,蔚蓝的天空是会下大雨的。
眼帘可以看见除了沙尘还有别的颜色的城墙。
厨房的库子不需因担心买不到现货而顿满几年都吃不完的干粮。
这个沙漠除了风和沙,还有很多美好的短暂友谊。
每个人,都是离乡背井来到沙城,朋友是热情的,但 每一个朋友都会有离开这里的一天。

今天倒数计时开始,把开袋的剩余面粉弄成水煎包(生煎包),我家孩子爱吃的!!食谱是和以前的相像。好怀恋“上海1930”餐馆!这一次共搓弄了35粒水煎包, 那鬆软的肉包和脆皮焦底是好吃呐!! 

Making the Shui Jian Bao / Sheng Jian Bao or Pan Fried Pork Bun using the leftover flour, need to clear the pantry before I go on long summer holidays! This Shui Jian Bao is one of my son favourite, if you give him between spring roll and one of this Shui Jian Bao/ Sheng Jian Bao, for sure he will choose the bao! My first encountered with this crispy fried bottom and soft bun was in 2013, the "Shanghai 1930" restaurant make great Shui Jian Bao! 

This round, I made 35 pieces using the same quantities for bao dough but almost double the previous filling recipe. If you are not consume the baos in the same day, keep the extra raw baos in freezer, no need to thaw the bao when cooking, just place the frozen bao straight to the pan, add oil, 1/3 water of the height of bao, cook with medium fire.

Happy summer holidays and see you in late August! 


Ingredients for filling:
800g minced pork
2 egg
3 tbsp tapioca flour
150g chives, chopped
3 tbsp mirin
3 tbsp oyster sauce
1 tsp salt
3 tbsp sugar
200ml water
5 tbsp homemade rice wine

a dash of black pepper

Method:
Mix all ingredients together in a bowl, stir in one direction until all liquid absorb by the meat. Place in fridge for later use.

Yield:35 pieces big baosIngredients for Bao dough:
800g mantou flour (or all purpose flour)
600ml warm water (gradually add in)
90g sugar
5g instant dry yeast
2 tbsp cooking oil

some sesame seeds
some water for cooking

Method:
1. In a big mixing bowl, add the flour, sugar and dry yeast. Gradually add in water. Use a pair of chopstick to stir the mixture together. Then knead it into smooth dough. Let it rest for 10 mins.
2. Divide the dough into 35 pieces (can divide more), flatten the dough with your palm and press the edge of the dough thinner than the middle part. Stuff in filling. Pleat the dough together and seal it on the top. (can sprinkle sesame seeds on top)
3. Prepare a flat bottom pan, pour in 2 tbsp cooking oil, arrange the bao doughs into the pan, switch on the heat to medium, pour in some warm water (about 1/3 of the bao height) and cover the lid. Let the water boil and dry in the pan (about 10~15 mins). When your hear drizzling sound, is time to open the cover.  The water should dry out and the bottom of the bao should be golden brown. 
4. Transfer the bao to a serving plate, sprinkle with some sesame seeds. 

Note: Should not heat up the pan with oil in it before you arrange the bao as it will char the bottom of the bao before you manage to pour water in it. 

09 July 2015

Nut Free Black Sesame Macarons with Azuki Cream Cheese (黑芝麻红豆乳酪马卡龙)


Black Sesame Macarons with Azuki Cream Cheese, a very unique Asian flavour, I believe. ^^
I have the pure fine black sesame powder, which I always used to make my own soy bean milk. This time I try out the black sesame powder to make my macarons. During baking time, the kitchen was filled with black sesame fragrance. 

Beside the factors that would affect your macarons which I mentioned in my Green Tea Macarons post, there is another factor I want to add on. The fine powder of the black sesame I used for this bake produced a smoother top macarons then the previous Green Tea Macarons.

By the way, this is a Nut Free Macarons and no colour dye is added to it! Enjoy!


Yield: 8 pairs of macarons
Ingredients:
40g fine black sesame powder
40g icing sugar
30g egg white (~1 egg)
40g caster sugar
a pinch of salt


Filling:
50g Philadelphia cream cheese 
75g homemade azuki paste

Method:
1. Prepare the filling: Cream the azuki paste together with cream cheese. Mix it well, place in the fridge for later use.
2. Heat up the oven at 150C. 
3. Sieve the black sesame powder and icing sugar, twice. Set aside.
4. Beat the egg white with a pinch of salt using KitchenAid speed 2, when it is foamy, add half of the caster sugar (20g), change the KitchenAid speed to 6, whisk for 3 mins. Add the remaining half of the caster sugar (20g), change the KitchenAid to speed 10, whisk until stiff peak form. 
5. Sieve in the dry ingredients to the egg white mixture, all in one-go. Fold the mixture with rubber spatula, deflate the meringue as you fold. Stop when the meringue able to drop down and ooze a bit when you lift it with the spatula. This is lava stage.
6. Add the batter into pipping bag with a plain nozzle. Then pipe out small circles on the baking tray lined with non stick parchment paper. 
7. Rap the baking tray on the worktop a few times, smooth the top of the macaron tip with moist finger. Use the toothpick to prick any stray bubbles trap on the macarons.
8. Let the macarons dry out beside the hot oven. When the macaron shells are dry to touch, then is time to place the baking tray inside the preheat oven at 150C for 10 mins. (The feet should appear less then 5 mins time) Then lower the oven temperature to 140C and continue to bake for another 8 mins. 
9. When the macarons are done. Remove the baking tray from the oven, lift the parchment paper at one edge and slide the whole parchment paper with macarons on to the cold surface or worktop. (As my worktop is marble) The baked through macarons should be able to remove from parchment paper without sticking on it. 

08 July 2015

Geen Tea Macarons with Azuki Cream Cheese(Matcha Macarons 绿茶红豆乳酪马卡龙)


I lost count of how many times my macarons was without feet. For the past three weeks, everyday the first thing I had to do after breakfast was baking macarons, on some days I  baked three batches. The unsuccessful attempts were not due to problem with the recipe but the baker (Me). I come to realize baking macaron is not so simple, beside the feet, a macaron should has minimize hollow shell, there are tons of reasons, the list go on never ending. Of course, after the successful baked it doesn't means that unsuccessful attempts no longer going to haunt me again. Well, my macarons is yet to reach the signature stylish smooth top it should have, a long way to go.

After all these experiments, I come to like the crunchy chewy texture of the macaron, the filling play an important role to tone down the sweetness of the over sweet macaron shell. 

Quantities
There are lot of myths for this little round pretty monster, one thing I can bust is the quantities of the ingredients, the ratio of ground almond, icing sugar and egg are not really important. Therefore when you sifted the icing sugar and ground almond, you can dump that chunky bits. 

Colour
There are many little things that cause an unsuccessful macaron, such as the dye that you add to the meringue. It is a sure no to add liquid colour, it'll makes the meringue soaking with that extra bit of water which result the macaron can't form a dry shell. I have try a few types of dye and come to satisfy with AmeriColor. However, if you don't have one, you can use any powder food colouring or the Wilton icing colour. 

Folding Meringue
Folding the meringue during the macaronage is another crucial factor, I tried my very best to fold as what the experts said, about 30-40 folds, then come to realize it's depends on the quantities of meringue you have. What Stella of BraveTart said in her blog made me realized I no need to be too gentle in folding the meringue, what we really need to do is incorporate the ground almond, icing sugar together with the meringue, and most importantly deflate the air in the meringue. So scrape the mixing bowl, fold the macaronage until "lava stage" which mean the mixture should be able to ooze a bit but not runny. Yes, if the ground almond is not incorporate properly to the meringue, it may cause crack or may contribute to a not smooth top for the macaron.

Temperature
Thanks to my friend who saw my crack macarons and told me it could be my oven  temperature was too high. I always set my oven temperature on 150C but until I placed the oven thermometer inside the oven then I realized the temperature inside my oven is way higher than the 150C, from that onward, every times the oven thermometer will be inside my oven when I bake the macaron, as this little monster really very sensitive to heat. However, I discovered that the temperature between 140C~150C is good for macarons. If the temperature is too high, the macarons may rise too fast and causing the hollow shell too.

Dry out the Macarons
Do you believe this is the most challenging part to me after all? I'm not that patient in waiting the macarons to sit out and dry by itself, so many times my unsuccessful macarons were due to this factor. I didn't wait long enough to let it form the dry shell and just pop them into the oven, of course the result was macarons with no feet. So until yesterday, I discover there is a technique used by lot of bakers, heat up the oven, leave the oven door open and let the baking tray sit close to the oven for about 10 mins. This will dry out the macarons the faster way. 

Lastly, I want to thanks Anncoo Journal for her Matcha Macarons recipe, all my experiments on macarons are using her recipe as my guide. The small quantities of the ingredients is just right for me to try out my experiments on macarons. 

Below is a video and a good article on Macaron which I find them useful, hope it's useful for you to see "feet" too! ^^ Happy Baking! 

Videos:
Blog:

07 July 2015

Green Tea Cream Puffs 绿茶泡芙


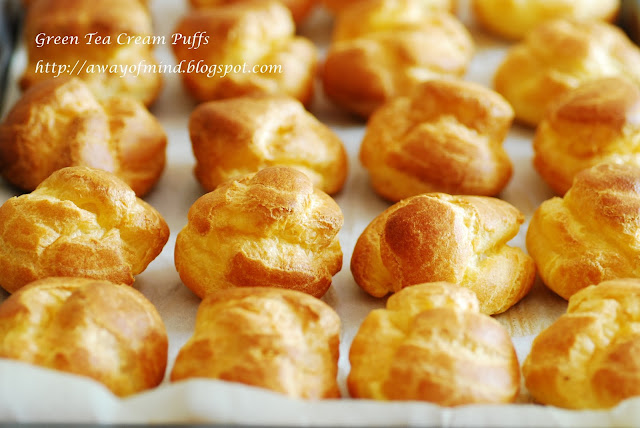
Try out a few bakes using green tea powder, one of it is baking choux pastry with green tea pastry cream filling. This is a dessert love by my family, the sweetness is just right with that unique mild green tea fragrance. The Choux puffs rise up to its maximum height, with crispy shell and hollow centre. 

This time I made my choux puffs smaller (1/3 of palm size), then I realized it only need around 25 mins baking time. If you are baking a bigger choux puffs like what I did in my previous baking, it may take a longer baking time. 

I'm using Okashi, Sweet Treats Made With Love recipe for the pastry cream and using my previous bake choux pastry recipe.


Yield: 32 pieces
Ingredients:
100g unsalted butter, soft
125ml water
125ml milk
5g caster sugar
3g table salt
150g pastry flour
5 1/2 eggs (it depends on the absorption of the flour you use, add 4 eggs first and see step 5)


pastry cream:
200g whole milk
1/2 tsp vanilla powder
3 egg yolks
50g sugar
20g pastry flour, sifted
5g green tea powder

Method:

1. Preheat oven to 200C. Line baking tray with parchment paper.
2. In a small saucepan, combine water, milk, butter, sugar and salt. Bring to a boil over medium heat, then remove from heat.
3. Using a wooden spatula, quickly stir in the flour until combined, and mixture forms a ball. Return to heat and keep stirring until the mixture leaves the sides of the saucepan and a film forms on the bottom of the pan.
4. Add in the egg one at a time, make sure each egg is fully incorporated before adding the next one.
5. Test the batter by taking a scoop of it using a wooden spoon. When you coat the batter and hang it down, the batter should form a smooth triangular shape. If you can't see it, that means you needs a little more egg (This depends on the absorption of the flour is, the original recipe only need 4 eggs but my baking need up to 5.5 eggs)
6. Pour the dough into the piping bag fitted with plain piping tip. Pipe out 5cm circles onto a lined baking tray and gently smoothing out the pointed peaks with a moistened finger.
7. Bake choux puffs for about 15 mins at 200C (you will see the choux pastry puffing up) then reduce temperature to 180C and continue baking for another 10 mins. (It may varies as it depends on your oven capacity)
8. Prepare pastry cream: 
Add milk, vanilla powder to a saucepan and bring to a boil. 
In a clean bowl, beat egg yolks with sugar until the mixture is pale and fluffy. Add flour and green tea powder, mix well.
Add hot milk to the egg mixture and fold well. Return the egg and milk mixture to the saucepan and bring to boil over high heat, stir constantly. Continue to mix until the mixture is smooth and glossy, remove the saucepan from heat.
Transfer pastry cream to a tray, cover with cling wrap and keep in fridge to cool. Before use, gently beat the cream with an electric mixer until smooth and creamy.
9. Assemble: Slice off a part of the top of choux puffs, pipe in the green tea pastry cream. If you are lazy like me, you can use a tea spoon to scoop a portion of the pastry cream into the choux puffs.


This post is linked to the event Little Thumbs Up (July 2015 Event: Tea

and hosted by Cheryl of Baking Taitai

03 July 2015

Palm Sugar and Coconut Milk Jelly (Agar Agar Santan Gula Melaka 耶糖燕菜)


This is the first time I made Four-layered Jelly, all the while I thought it will take a long while waiting for the Jelly to set before proceed to another layer, therefore I didn't try to make one. These few days I try to search a good recipe on palm sugar and sago, because one of my guest requested a dessert to have sago and palm sugar in it. 

I came across Coffee and Cream Agar Jelly by RunAwayRice, she shown the fast setting technique using ice bath which I find it useful for me. However, her recipe using "half and half" which I don't think I can buy it here, so I have to drop her recipe. Then, I came across Helen's YouTube recipe on her Rainbow Jelly. I decided to modified on Helen's recipe to make my Palm Sugar and Coconut Milk Jelly and also using the ice bath technique. 

This Agar-agar Santan Gula Melaka or Palm Sugar Coconut Milk Jelly is a perfect dessert for this hot summer, the sweetness of palm sugar is just right and the little sago in the coconut milk layer add a different texture to this beautiful delicious Jelly, my son and hubby love it so much. 

One special note I would like to add on ice bath technique is I find it awesome. You can see the Jelly setting and gauge the right timing to pour in the second layer, a crucial for the layers to stick together. 


Yield: 30 cm x 24 cm glass tray, about 16 serving

Ingredients:
1 pack of agar agar powder (12g)
6 cups of water
3 cups of coconut milk (Santan)
200g palm sugar (Gula Melaka)
150g sago

ice bath:
lot of ice cubes
plenty of ice water
a tray bigger than the Jelly mold

Method:
1. Prepare the sago: bring a pot of water to boil, add sago and stir constantly until the sago turned semi-translucent, switch off the heat and cover the pot, let the sago sit in the pot for another 10 mins. Check if the sago has turned translucent without any white spot. Pour the sago into a sieve and rinse with cold water. Set a side.

2. Prepare the ice bath: Place the Jelly mold in a bigger tray, add the ice cubes in between them, pour in the cold water until 2 cm from the top of the tray.

3. Prepare the agar-agar/ Jelly: Boil 6 cups of water in a pot, add the agar-agar powder, add the palm sugar, stir the mixture. When the water boiling, take out the white bubbles on the surface of the liquid, discard. Set aside. 

In another pot, boil the 3 cups of coconut milk. Scoop out 1 cup of palm sugar liquid and add it to the coconut milk. (If you prefer the coconut milk layer to be sweeter, you can add some brown sugar at this stage) Mix in the cooked sago.

4. Assemble: Pour about 2.5 cups of palm sugar liquid to the Jelly mold. It will set very fast, when the side of the surface is dry to touch but the middle of the Jelly still wobbly a bit, this is the right timing to pour in the second layer. Slowly pour 2 cups of coconut milk liquid with a ladle from the side then gently go into the middle, be very careful not to break the first layer. 

Wait for the second layer to set a bit, check if the side of the surface is dry to touch and the middle still wobbly. Again, slowly pour in the third layer which is the palm sugar layer. When it is set, then repeat for the forth layer which is the coconut milk layer. 

Place the Jelly in the fridge, let it set completely before cutting.