17 November 2017

Pandan Swiss Roll 香兰蛋糕卷


A backlog post. 


Pandan Swiss Roll always has its place in my heart. The soft fragrance sponge and the sweet thickening cream melts like ice cream in the mouth! Simply delicious! 

Yield: 13~14 slices


Using 30cm x 40cm baking tray yield a super long Swiss roll


Rectangle baking tray 30 cm x 40 cm

Recipe:
egg batter:
4 egg yolks
20 g sugar
80 g cake flour
40 ml coconut milk
20 ml pandan juice
40 ml avocado oil
1 tsp pandan paste

meringue:
4 egg whites
60 g sugar
a pinch of salt

filling:
400 ml thickening cream / whipping cream
20 g icing sugar

Method:
Prepare the baking tray: lay baking tray with parchment paper. 


1. In a mixing bowl, add the egg yolks and sugar. Beat it with hand whisk until pale and creamy. Add coconut milk, pandan paste and pandan juice, stir until combine. Add the sieved cake flour in batches and avocado oil, mix well.  

2. In a clean mixing bowl, using electric mixer, add salt and beat the egg whites until foamy, turn the kitchen aid mixer to high speed, add the sugar in three batches, beat until soft peak stage. 


3. Take 1/3 of the meringue, mix with egg yolk batter, mix well. Then fold in the remaining meringue to egg yolk batter.  

4. Pour the cake batter on to the lined baking tray, smooth the top with a rubber spatula. Tap the baking tray on the worktop to release any trap bubbles. Bake at preheat oven at 180C on the middle rack for 15 mins. 
5. When the cake is done. Take it out from the oven and flip the cake on a cooling rack, peel away the parchment paper from the cake. Flip the cake back to the top side up. Set aside to cool.

6. Using an electric mixer, whip the thickening cream or whipping cream with icing sugar until the cream double in volume. 
7. Spread the cream on the cold cake. Roll the cake up Swiss Roll style. Keep it in the freezer for at least 3 hours or until the filling is harden before cutting. 


16 September 2017

Traditional Baked Mooncakes 传统烘月饼


This is the second time I baked the traditional baked mooncakes, the first time was few years back when I was living in Qatar, a group of ladies from Asian Coffee Morning came to my place and we baked quite a number of mooncakes together. It was a fun memory. Hope the ACM is doing well, I'm still grateful that through ACM I still keep in touch with a few good friends even we no longer stay in the same continent. 

The making of traditional baked mooncakes is not difficult as we think, the most important part to me is get the right browning on its crust. I baked my mooncakes around 180C for a total of 22 mins, middle rack in the oven. 

Two months before this mooncake making, I brine the chicken eggs in two separate bottles, hopping to get 12 pieces of homemade salted eggs, however, one bottle of the salted eggs didn't turn out well. So I only get 6 pieces of homemade salted eggs this round. Of course, at this time it is no time for me to brine another batch of chicken eggs for mooncakes making, so I got some store bought salted duck eggs ready for my next baking. 

The best part for this recipe is no lard added, and I added flax seed into the filling too. 


Ingredients:
big mould (125g): ~90 g filling, 45 g skin dough, make 10 pieces
small mould (60g): ~35 g filling, 30 g skin dough, make 4 pieces

Skin Dough:
350 g low protein flour (cake flour)
210 g golden syrup
100g  Rice Bran Oil (or any cooking oil)
1.5 tsp Alkaline water (lye water) (optional, to get a better shape)

Filling:
540 g Black sesame paste, divide into 6
500 g Red lotus paste, divide into 4 x 90 g, and 4 x 35 g
some white melon seed, roasted
some sunflower seed 
some flax seed
6 homemade salted egg yolks (can have more if you wish)

Egg wash:
1 egg yolk + 1 tbsp milk

Method:
Prepare the salted egg yolk: 
1. Crack the salted egg, separate the egg yolk with egg white, wash the egg yolk under  running water to get rid of the egg white, spray the egg yolk with some Chinese cooking wine. Place on a steamer and steam for 3~4 mins. Set a side to cool.

Prepare the filling:
1. Mix the paste with some white melon seed, sunflower seed and flax seed.
2. Separate the store bought paste into the portions you want, for my case I want to separate the one with egg yolk and without egg yolk. So I divide into 6 big portions for black sesame paste and make 4 big 4 small portions for the red lotus paste.
3. stuff the egg yolk into the middle of black sesame paste and wrap them up, shape into a ball. I didn't place egg yolk for red lotus paste.
4. Set aside.

Prepare the skin dough:
1. In  a mixing bowl, mix golden syrup, rice bran oil and alkaline water together, sift in the flour. Mix well and use hand to gentle knead the dough together.
2. Cover the dough with cling wrap, let it rest for an hour.
3. Divide the dough into the portions you want, for my case 10 big portions (~45 g each) and 4 small portions (~30 g each)
4. Flatten the skin dough with rolling pin between two pieces of cling wrap, place the filling in the middle and wrap up the dough, shape it into a round ball, use the mooncake presser, press and release the dough into lined baking tray. Repeat until all the dough and filling are done.
5. Bake at preheat oven at 180C for a 10 mins, bring out the mooncakes, egg wash and bake for another 12 mins or until the mooncakes surface is lightly brown. Cool on wire rack. 


14 September 2017

Pan Mian 板麺 (Hakka Flat Noodle Soup)


This week lot of happening, I'm glad that the backyard renovation comes to its end. My son orthodontics treatment going into second stage, pray that it will all go well and he will not experience any pain. 

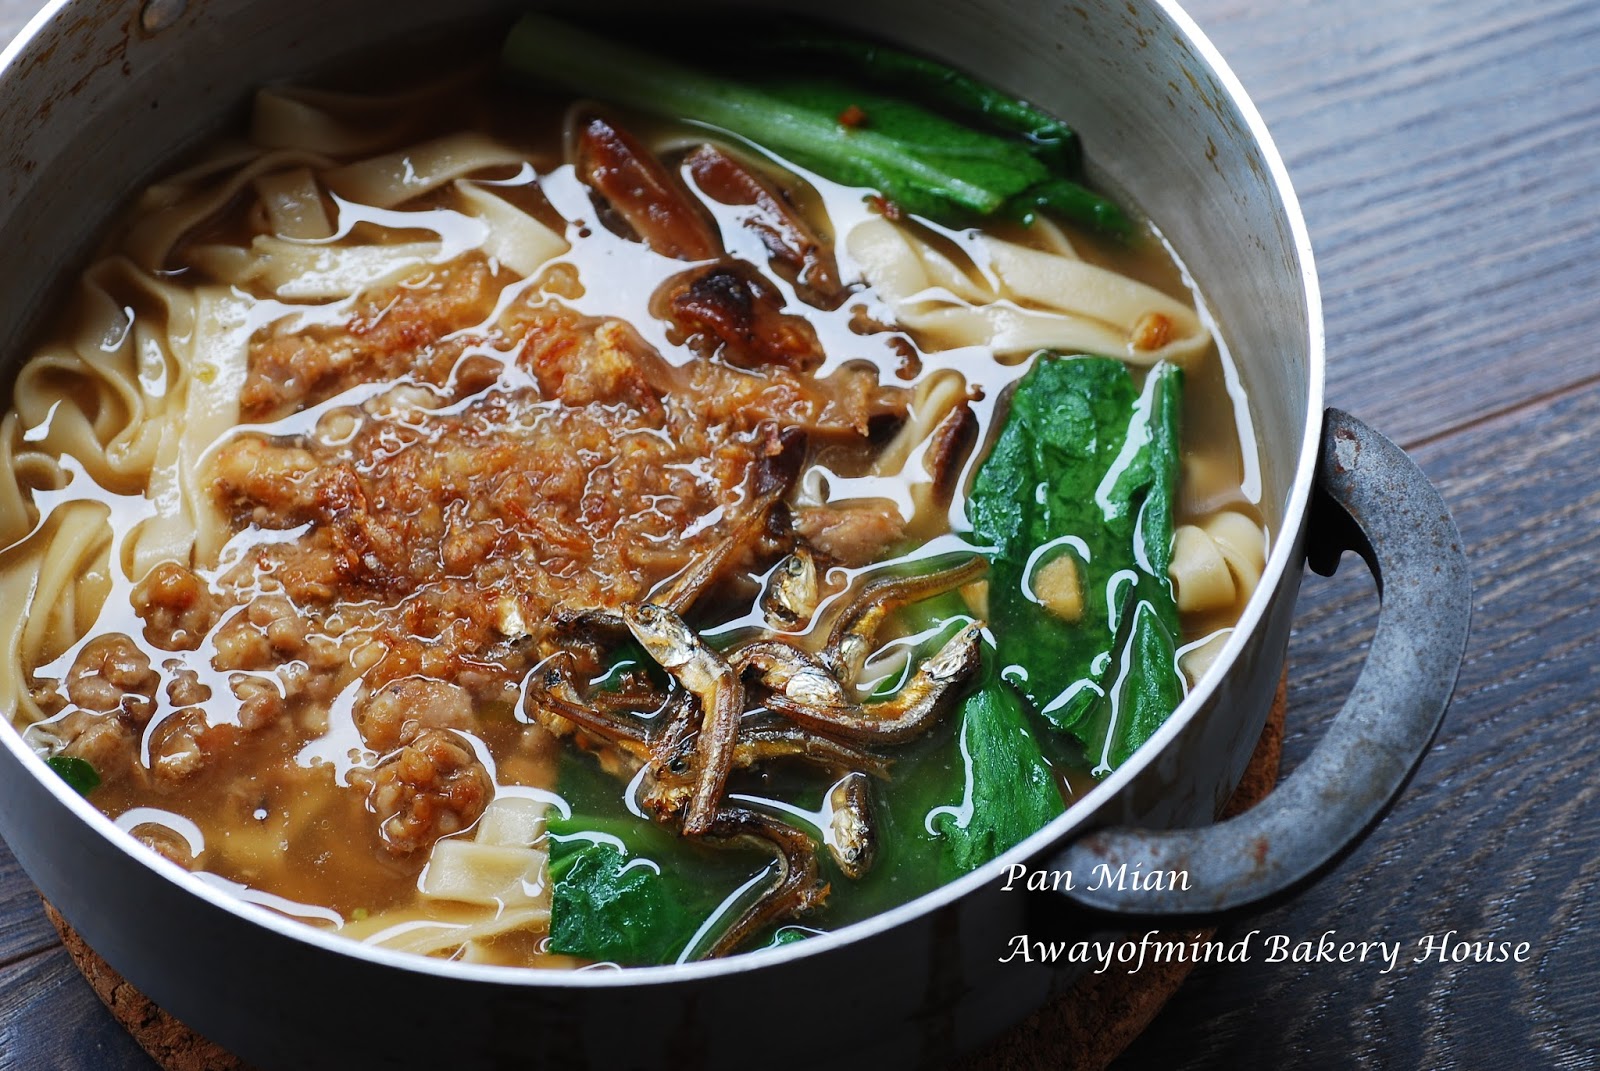
This week, I lug out my pasta maker and making Pan Mian or Ban Mian (Pan Mee) a kind of Hakka flat noodle soup which is popular among Malaysian Chinese. I ate a lot of Pan Mian when I was living in Kuala Lumpur. If the dough is torn into pieces the dish is called Mee Hoon Kueh 麺粉糕 (Hand-torn noodle), however, if the dough is made into noodle strips then the dish is called Pan Mian 板麺. The noodle is with a simple flour based dough and the broth is cooked with anchovy. I cooked my broth with some pork soup bone before adding the anchovy to enhance the soup flavour. Traditionally this noodle soup is accompany with Mani Cai (Sauropus androgynus) but I can't find it in Sydney, so I use Choy Sum. 

My hubby and son thumbs up for this noodle soup. ^^

好久没做手工麺了,搬出道具来弄麺的心情是喜悦的。滑爽弹牙的麺条从筷子刷进口里的感觉是。。。棒!


(yield 3 bowls of noodle) Ingredients:
For broth:
300 g pork soup bone, cook in boiling water for 5 mins, drain well
3 litres of water
3 cloves garlic, crushed lightly
a handful of dried anchovies (~ 20g)
3 tbsp of oyster sauce
2 tbsp of fish sauce (to taste)
a tablespoon of cooking oil

For noodle:

315 g plain flour
1/2 tsp salt
120 ml water (can add more water if the dough is too dry)
1 egg
1 tbsp cooking oil

Accompaniments:
5 shiitake mushrooms, thinly sliced (seasoning with 1 tbsp oyster sauce, 1/2 tsp dark soy sauce)
250 g minced pork plus chopped shrimps (seasoning with  1 tbsp sesame oil, 1 tbsp light soy sauce, 1 tbsp Chinese cooking wine, a pinch of pepper, 1 tbsp sugar, 1 tbsp oyster sauce, 1 tbsp dark soy sauce, and 1 tsp tapioca flour) 
Some Choy sum, or any types of green vegetables
eggs 

For garnish:
some fried shallots
1 cup dried anchovies, fried in oil till it is crispy 


Method: 
1. Prepare the noodle: In a mixing bowl, combine the flour, salt, egg and cooking oil, make a well in the centre, gradually add water. Using a pair of chopstick, mix all the ingredients until it comes together. Hand knead the dough until it form a stiff dough. Add a tablespoon of water at a time if the dough is too dry. Knead the dough until it is smooth. Cover with cling wrap and let it rest for an hour. 

After resting, the dough is soft and pliable, divide into three portions and roll out using the pasta maker. Floured the worktop surface, adjust the the dial for pasta machine to thickness "6" which is the thickest, slowly roll the dough over. When the whole piece of dough has been rolled over the machine, adjust the dial to "5" and repeat the step until your desire thickness. I stop the dial at thickness "2".

Roll the dough over the pasta cutter. Cut the noodles using a scissor. (Dust with more flour if the dough is sticky) Hang the noodles to dry on the wooden noodles stand. 

2. Prepare the accompaniments: In a big soup pot(A), add a tablespoon of cooking oil, fry the garlic (ingredient in the broth), place the seasoned sliced shiitake mushroom, stir fried it for at least 5 minis or until the mushroom is cooked. Take out and set aside.

In the same pot (no need to clean the pot), place the seasoned minced pork and chopped shrimps, stir fried for 10 mins or until the minced pork and shrimps are cooked. Dish out, set aside for later. 

3. Prepare the Broth:  In another soup pot(B), place the pork soup bone, add the 3 litres water and cook for at least 30 mins. In the same big soup pot(A) use for frying shiitake mushroom and minced pork and chopped shrimps, add a tablespoon of cooking oil, fry the dried anchovies until it is fragrant. 

Pour the soup from pot B to pot A. Bring to boil and simmer for about half and hour, top up water if the water level is low, add oyster sauce and fish sauce (to taste).

4.  To serve: Ladle about 300 ml of broth into a small pot, bring to boil, add noodle. Use a pair of chopstick to separate the noodle so it will not stick together. Add a few tablespoons of minced pork and shrimps, add the shiitake mushroom, let it cooks for a min. Then add vegetable, crack an egg into the soup, with the egg yolk still soft and runny transfer to a serving bowl, garnish with fried shallots and crispy fried anchovies. Serve with chilli sauce. 

12 September 2017

Sausage Buns 香肠面包 (65C Tangzhong Method)


Making buns for breakfast! I have some thin sausages in the fridge, this round I pan fried the sausages before stuff them into the buns just to make sure they are cooked completely. 

This recipe yield 14 buns. 


Ingredients:
65C Tangzhong/ water roux starter:
30 g bread flour
150 ml water

Bread dough:
all tangzhong
400 g bread flour
100 g cake flour (low protein flour)
30 g sugar
6 g dry instant yeast
1/2 tsp salt
50 g soft unsalted butter
200~250 ml water (add gradually)

Filling:
7 sausages cut into half to make 14 pieces

Garnish:
egg wash (1 egg yolk), mayonnaise, tomato sauce, some dried parsley  

Method:
Prepare water roux starter: in a small pan, place the bread flour and water, mix well and cook the mixture until it starts thicken, remove from heat, cover with cling wrap and set aside to cool.

Prepare the filling: in a pan, add 2 tablespoons of cooking oil, pan fried the sausages until it turns slightly brown, set aside to cool. 

Prepare the bread dough: Add the water roux starter, and all dry ingredients. Gradually add water and mix with KitchenAid speed 2 until it combined, change the KitchenAid speed to 4, mix until it form a rough dough (the dough is not stick to the mixing bowl wall). Add butter in pieces. Continue to mix with speed 4 until the Windowpane stage.

Cover the dough and let it proof to double its size, about 50 mins. (depends on the surrounding temperature) 

Take the dough out, punch down the air. Flatten the dough a bit and divide into the portion you want. In my case 14 portions. Shape the dough into equal small balls. Let them rest for 10 mins. 

Roll the dough into a long thin strip of about 30cm. Place a piece of sausage at one end and wrap the bread dough against the sausage, place the dough on the baking tray. Repeat until all dough is done. Spray with a bit of water on the bread dough, let it proof until double its size. 

Egg wash and garnish the bread dough, bake at preheat oven at 180C for 15 mins. or the bread turns slightly brown. Take out and let it cool on wire rack. 

25 August 2017

Cranberry Cinnamon Rolls 蔓越莓糖浆肉桂面包卷 (65C Tangzhong Method)


This is a busy week as the backyard renovation started, beside the noise, outdoor space is complete covered with snowy construction dust. It really disturbs my daily routine.

Today I go back to my old recipe with minor adjustments, bake the soft and fluffy cranberry cinnamon rolls which is one of my family favourite. The fragrance of cinnamon sugar in the bread is so comforting. 12 buns won't be enough for three of us! 


Ingredients:
Tangzhong/ water roux starter:
30 g bread flour
150 ml water

bread dough:
500 g bread flour 
55 g pastry flour (top flour)
30 g milk powder
5 g instant dry yeast
60 g fine sugar
1/2 tsp salt
all the Tangzhong
200 ml water (add gradually)
20 g golden syrup
60 g butter, chop in small pieces


Filling:
100 g dried cranberry 
3 tablespoons cinnamon sugar

Egg wash:
1 egg, beaten
some raw coarse brown sugar, to sprinkle on top of dough (optional)


Method:
1. Prepare Tangzhong: Mix together ingredients in Tangzhong, cook under medium heat, keep stirring until the mixture thicken, not boiling. Remove from heat and set aside until cool.
2. Prepare bread dough: In the electric mixing bowl, add all Tangzhong and bread dough ingredients except water and butter. Gradually add water (set aside 50 ml for slowly add in) and mix with KitchenAid speed 2 for a min before change to speed 4. Slowly add more water. 

3. When the mixture form rough dough or able to pull away from the mixing bowl, add in butter. Continue to let KitchenAid knead the bread dough until elastic windowpane. It means the bread dough is able to stretch open on your palm without tearing. 

4. Cover the dough and let it proof to double its size. Punch out the air in the bread dough, use the rolling pin to flatten the dough into 60cm x 40cm rectangle (As the bread dough is very soft you may need to dust your hands and worktop with flour for easy handling the dough, use the dough scraper to help handling the bread dough without adding too much addition flour). Sprinkle cinnamon sugar to cover all the dough area, place the dried cranberry on top.

5. Roll up the dough into a log, slice the dough into 12 portions (depends on you baking pan). Place the dough into lined baking pan, cover and let it proof until it double its size. Brush with egg wash. Sprinkle some raw coarse brown sugar on top of the bread dough.

6. Bake in a preheat oven at 180C for 20 mins. or until the top of the bread turned slightly brown. 

10 August 2017

Green Tea Spiral Mantou (Chinese Green Tea Steamed Bun 緑茶双色馒头卷 ) (Overnight Sponge Dough Method)


Mantou (Chinese Steamed Bun) is a simple versatile bun, you can add varieties of flavour to the bun to suit your family taste buds. This is my second spiral mantou, you may like to look into my previous Chocolate Spiral Steamed Bun if you prefer the chocolate flavour. 

Matcha green tea flavour mantou is very refreshing, just keep the green tea powder to a teaspoon, the distinctive bitterness of the green tea will not overpowered the plain milk bun portion. To get the beautiful green tea spiral the proportion of green tea dough and plain dough for this creation is 1:3.


Ingredients: 
Overnight Sponge Dough:
60 g low gluten flour (中劲面粉)
40 ml water
1/2 tsp instant dry yeast

1 tsp sugar

Mantou Dough:
all of overnight sponge dough, tear into small pieces
350 g low gluten flour

1/2 tsp instant dry yeast
200 ml warm milk 
30g fine sugar
1/4 tsp salt
1 tsp green tea power + 1.5 tbsp water (for green dough)


Method:
Prepare the overnight sponge dough: 
1. Place all dry ingredients in a bowl, pour in water, stir well to combine. Mix well.
2. Place the mixture in a plastic cling, tighten the dough. Place the dough in the fridge proof overnight.

3. Take out the dough 30 mins before using. 

Prepare the mantou dough:
1. Place all dry ingredients in a big mixing bowl, gradually add in 200 ml warm milk. Knead the dough together to form rough dough. Take out 1/3 of the dough and mix with the green tea-water paste. knead well. 
2. Knead the 2/3 milk dough to smooth dough (add more milk if the dough is dry). Cover and let it proof to double in size.
3. Knead the 1/3 green tea dough to smooth dough (add more milk if the dough is dry, add a bit of flour if it is too sticky). Cover and let it proof to double in size.
4. Punch down the air in the milk dough and flatten it to rectangle thin dough. Do the same for the green tea dough. Flatten the green tea dough to the same rectangle size as the plain dough. 
5. Overlap the green tea dough on top of the milk dough as in the photo. Roll the dough up gently. Cut the dough into 2 inch section, place a piece of parchment paper below each dough. (note: At this stage, I actually cut the dough into two portions before I roll up the dough, I flipped one dough into opposite colour with the other portion so to get green dough at the outer design)
6. The steamer has to be preheated to around 35C, switch off the fire. Place the mantou dough inside the steamer and proof for 15 mins or until it is double it size. 
7. Switch on the fire to medium and steam for 15 mins. Leave a gap on the steamer when it is nearly done, you have to place a chopstick between the lid and the steamer.
8. Switch off the fire immediately when the steaming time is 15 mins. Let the mantou sit off heat in the steamer for 5 mins before take them out. 

04 August 2017

Old School Sponge Cake (Gochabi) 古早味鸡蛋糕 (Cooked Dough Method)


Old school sponge cake (Gochabi) also popular known as Taiwanese Old Fashion Sponge Cake "Ji Dan Gao". It is light and fluffy with the dedicate eggy fragrance, the texture of the cake is smooth and dedicate. My family love it very much!

I have tried on a few recipes, the one using cooking oil, olive oil and butter respectively. I find that the one using butter produces the best flavour which is to my liking. The olive oil I used is way too strong and it overpowered the dedicate egg flavour in this Old School sponge Cake. Personally I find using cooked dough method produced a stable cake, the cake doesn't shrink after taking out from the oven. 

Cake pan size: 8 inch square pan


Ingredients: 
70 g butter
100 g cake flour
100 g fresh milk
6 egg yolks
1 whole egg
6 egg whites
80 g sugar
1/4 tsp salt

Method:
1. Line the baking pan with baking paper. Preheat the oven to 140C.
2. In a small soup pan, heat up the butter until it just start to bubbles. Remove the pan from heat. Add in the cake flour, stir well. Add in the milk, mix well. Add the whole egg, and the egg yolks (in three batches), mix well until no lump found. 
3. In a clean mixing bowl, add in the salt and egg whites, using KitchenAid speed 4, whisk until foamy, add the sugar in three batches, using speed 10, whisk the egg whites until soft peak stage.
4. Take 1/3 of the egg whites (meringue) add it to the egg yolks mixture, mix well. Pour the egg yolks mixture into the remaining egg whites, fold it properly.
5. Pour the batter into the 8"inch cake pan. Level the batter, knock the cake pan against the table to release the bubbles trap between the batter.
6. Place the cake pan in the preheat oven at 140C, steam bake the cake using water bath method for 60 mins or the toothpick come out clean. Switch off the heat in the oven, let the cake sit in the oven with door ajar for 5~10 mins. 
7. Take the cake out from the cake pan, and let it cool completely at the wire rack before slicing. 

31 July 2017

Char Siu Bread Buns 叉烧面包 (Chinese BBQ Pork Buns) (65C Tangzhong Method)


Char Siu Bread Buns or Chinese BBQ Pork Buns is my son latest favourite breakfast (of course he has many type of favourite breads because his mum love to make breads ^^) I used the leftover Char Siu Bao filling to make this baked buns. 

The bread texture is super soft, I'm using golden syrup and water roux starter in this bread making. I like both steamed and baked Char Siu Buns. How about you? 

This recipe yield: 16 buns


Ingredients:

Tangzhong/ water roux starter:

30g bread flour
150ml water

bread dough:
500g bread flour 
55g pastry flour (top flour)
30g milk powder
5g instant dry yeast
60g fine sugar
1/2 tsp salt
~110g Tangzhong
160 ml water (add gradually)
20g golden syrup
60g butter, chop in small pieces


Filling:
180 g BBQ Pork filling (Char Siu filling)

Egg wash:
one egg yolk with 2 tablespoons of milk, mix well

Method:
1. Prepare Tangzhong: Mix together ingredients in Tangzhong, cook under medium heat, keep stirring until the mixture thicken, not boiling. Remove from heat, cover and set aside until cool.

2. Prepare filling: Please refer to Steamed BBQ Pork Buns (Char Siu Bao)

3. Prepare bread dough: In the electric mixing bowl, add all bread dough ingredients except water and butter. Gradually add water (set aside 50ml for slowly add in) and mix with KitchenAid speed 2 for a min before change to speed 4. Slowly add more water. 
4. When the mixture form rough dough or able to pull away from the mixing bowl, add in butter. Continue to let KitchenAid knead the bread dough until elastic windowpane. It means the bread dough is able to stretch open on your palm without tearing. 
5. Cover the dough and let it proof to double its size. Punch out the air in the bread dough, divide the dough into 16 equal portions. Shape the dough into round balls. Let it rest for 10 mins.
6. Flatten the dough into circle with middle part a bit thicker than the edge. Place a heap teaspoon of BBQ pork filling in the middle. Wrap up the edge of the dough, shape the dough into round ball. Place the dough on the baking tray, let it proof until double its size.
7. Egg wash the dough. Use a sharp razor, gently slice a few slices on the top of the bread. 
8. Bake in a preheat oven at 180C for 15 mins. or until the top of the bread turned slightly brown. 

28 July 2017

Char Siu Bao (Steamed BBQ Pork Buns) 叉烧包


Char Siu Bao is the Chinese Steamed BBQ Pork Buns which you can easily find at any Chinese Restaurant especially the one selling Dim Sum or Yum Cha. The size of the Char Siu Bao can be varies, some restaurants make the Char Siu Bao in dedicate bite size, however, some prefer it to be half our palm size. To me, I love Char Siu Baos because of its filling, the sweet, sticky with a faint fragrance of oyster sauce, the taste just make you want to continue eat more of it. 

I can't find Hong Kong flour over here and I'm using Lighthouse self-raising flour for steamed buns. The baos came out a bit yellowish and not totally white in colour like the one selling. To cut short the cooking time, I bought the real deal tender and juicy Char Siu instead of homemade. 

This recipe yield 21 buns. (I have extra filling for another bread making)


Ingredients:
BBQ pork filling (The filling is able to make 40 buns):
500 g diced Char Siu (BBQ Pork)
1 small brown onion, diced
1 tablespoon sesame oil
2 tablespoons sugar
3 tablespoons Chinese cooking wine
4 tablespoons oyster sauce
2 tablespoons dark soy sauce
3 tablespoon tapioca flour
1 tablespoon light soy sauce 
1/2 tablespoon cooking oil
500 ml water

Bao Dough:
400 g self-raising flour for steamed bun
8 g instant yeast
160 ml warm water
30 g vegetable oil
60 g sugar
10 ml cold water
2 teaspoons baking powder

Method:
Prepare the BBQ filling:

1. Heat up a cooking pan with cooking oil, add diced onion. Stir fried the onion until it is soft. Add the diced char siu, pour in the water. Add sesame oil, sugar, oyster sauce, light soy sauce and dark soy sauce. When the water is boiling, turn the heat to medium, add the Chinese cooking wine, let it continue simmer for a while. Taste the char siu, if you prefer it to be sweeter, add more sugar. (The Char Siu filling should be strong in flavour so it can fusion well with the plain bao texture) 
2. In a small bowl, add tapioca flour and mix well with 2~3 tablespoons of water, mix well. Pour the tapioca mixture into the cooking pan. Let the Char Siu gravy thicken. Remove the pan from the heat. Set aside to cool before store in the fridge for at least 2 hours (I let the filling sit overnight in fridge)

Prepare the bao dough:
1. In the mixing bowl, add self raising flour, instant yeast, warm water, and sugar. Using KitchenAid, speed 1 mix the flour mixture together to form rough dough. Add in vegetable oil, continue to knead in speed 2 until the dough is smooth.
2. Cover the dough and let it proof until double its size.
3. In a small bowl, add baking powder and the cold water. Mix well. Set aside.
4. When the bao dough is ready, punch down the air. Mix the dough with baking powder mixture, knead well. Let it rest for 15 mins.
5. Divide the dough into the desire portion, for my case 21 portions. Shape the dough into round balls, rest for 10 mins.
6. Flatten the dough, wrap in a heap teaspoon of filling, wrap up and seal the dough. Place a piece of baking paper below each bao dough.
7. Arrange the bao dough in a pre-heat off heat bamboo steamer (or any type of steamer you have). Let it proof for 15 mins. 
8. Switch on the heat, steam the bao for 10 mins. Off the heat, let the bao sit inside the off heat steamer for 5 mins before taking them out. Serve warm. 

27 July 2017

Kopitiam Milk Buns / Plain Milk Buns (Overnight Sponge Dough Method)


Kopitiam Milk Buns is the plain milk buns that always selling at coffee shop when we were young. It doesn't has any distinctive taste, so the usual ways of eating it is by dipping the bun into the coffee, milo, soft boil egg, or go with kaya and butter. This bun was very popular among bloggers two years back. I always not able to keep up with the current popular bakes.

I tried with two recipes this round, one with overnight sponge dough and the other one with straight dough method. Both gave me soft bread on the day of bake, however, the bread was not soft to touch on the second day and I have to heat them up in the microwave for 20 seconds to get the soft bread. I'm not sure could it be the butter used was way too little for the straight dough and was it the overnight sponge dough I used way too dry? 

I referred the recipe from My Little Favourite DIY (overnight Sponge Dough Method). This recipe yield 9 buns.


Ingredients:
Overnight Sponge Dough:
215 g bread flour
125 g cold milk
1/2 teaspoon instant yeast

Milk buns Dough:
the overnight sponge dough
90 g bread flour
30 g egg
1/2 teaspoon instant yeast
1/2 teaspoon salt
60 g sugar
45 g room temperature soft butter
1 tablespoon cold milk (I used 3 tablespoon of cold milk)

Method:
Prepare the overnight sponge dough: 
1. Add all ingredients in a mixing bowl, combine to form a rough dough, do not need to knead until windowpane. Cover with cling film and immediately store in the fridge for overnight (at least 12 hours)

Prepare the bun dough:
1. Tear the overnight sponge dough into pieces and add all ingredients except butter into the mixing bowl, using KitchenAid speed 1, combine together and change to speed 2, knead until smooth dough.
2. Add in butter and knead until elastic windowpane. Cover with cling wrap and let it proof until double its size.
3. Punch down the dough, flatten it and divide into nine equal portions. Shape the dough to round balls. Place them in a line square pan and let it proof  to double its size.
4. Bake at pre-heated oven at 180C for 15 mins.